There are some recipes that just feel like home, aren’t there? This cherry cake is one of those for me. It’s the kind of cake that brings a smile to everyone’s face, from my youngest niece who can barely reach the table to my dad who claims he’s “off sugar” but always somehow ends up with a second slice. Honestly, if you’re looking for a dessert that’s bursting with flavor but won’t have you tied to the kitchen all day, you’ve found it. It’s not quite a Bundt, not quite a sheet cake, but somewhere wonderfully in between. Think of it as your new best friend for potlucks, lazy Sunday afternoons, or even just that 3 pm craving for something truly special. It’s my absolute favorite cherry Cake Recipe, hands down.
What is a cherry cake?
So, what exactly *is* this cherry cake that I’m so obsessed with? Well, it’s a delightful, moist cake packed with the sweet-tart goodness of cherries, usually nestled in a tender, buttery crumb. The name itself, “cherry cake,” is pretty straightforward, but what sets this particular version apart is its incredible balance of flavors. It’s not overly sweet, which I love, allowing the natural tanginess of the cherries to really shine through. It’s essentially a celebration of cherries, baked into a cake that’s both comforting and sophisticated. My grandmother used to make a simpler version, just a basic sponge with cherries folded in, but this recipe takes it up a notch with a few extra touches that really make the cherries sing. It’s the kind of cake that feels both familiar and excitingly new with every bite.
Why you’ll love this recipe?
There are so many reasons why this cherry cake has become a staple in my kitchen, and I just know you’re going to fall in love with it too! First off, the flavor is just out of this world. You get these little pockets of bright, juicy cherry goodness throughout the cake, perfectly complemented by the tender, not-too-sweet crumb. It’s got that wonderful balance – not too rich, not too light. Then there’s the sheer simplicity of it all. I’ve tried my fair share of complicated cakes, and while they can be delicious, sometimes you just need something that’s reliable and relatively quick. This recipe is a lifesaver on busy nights when I want to whip up something impressive without all the fuss. Plus, it’s wonderfully budget-friendly. Cherries, flour, sugar – these are all pantry staples, making it an accessible treat for everyone. What I love most about this cherry cake, though, is its versatility. It’s just as happy sitting pretty on a dessert table as it is being enjoyed with a cup of coffee on a quiet morning. It’s so much more than just a cake; it’s a little slice of happiness. It’s truly the best cherry cake I’ve ever made.
How do I make a delicious cherry cake?
Quick Overview
This cherry cake comes together surprisingly easily! You’ll whisk together your dry ingredients, mix your wet ingredients separately, then combine them gently. While that’s happening, you’ll get your cherries prepped and ready. The magic happens when you layer the batter and the cherry filling, creating beautiful swirls throughout the cake. Then, it’s just a matter of baking until golden and fragrant. Finally, a simple glaze ties it all together. It’s a straightforward process, and the result is a showstopper that tastes like you spent hours on it.
Ingredients
For the Main Batter:
2 ½ cups all-purpose flour (I always use King Arthur’s, it’s reliable!)
1 ½ teaspoons baking powder
½ teaspoon baking soda
½ teaspoon salt
1 cup (2 sticks) unsalted butter, softened (make sure it’s truly soft, not melted!)
1 ½ cups granulated sugar
3 large eggs, at room temperature
1 teaspoon pure vanilla extract
1 cup buttermilk, at room temperature (this is key for moisture! If you don’t have any, you can make your own by adding 1 tablespoon of lemon juice or white vinegar to 1 cup of milk and letting it sit for 5 minutes.)
For the Filling:
2 cups pitted fresh or frozen cherries (if using frozen, don’t thaw them completely, just let them soften slightly)
¼ cup granulated sugar
1 tablespoon cornstarch (this helps thicken the juices)
1 tablespoon fresh lemon juice (brightens up the cherry flavor)
For the Glaze:
1 ½ cups powdered sugar, sifted
2-3 tablespoons milk or cherry juice (for a pretty pink hue)
½ teaspoon pure vanilla extract
Step-by-Step Instructions
Step 1: Preheat & Prep Pan
First things first, let’s get your oven ready. Preheat it to 350°F (175°C). You’ll want a 9×13 inch baking pan. Grease it really well with butter or cooking spray, and then dust it lightly with flour, tapping out any excess. This step is crucial to make sure your beautiful cherry cake doesn’t stick. I like to also line the bottom with parchment paper for extra insurance; it makes lifting the cake out so much easier.
Step 2: Mix Dry Ingredients
In a medium bowl, whisk together the flour, baking powder, baking soda, and salt. Give it a good whisk to make sure everything is evenly distributed. This prevents you from getting pockets of leavening agents in your cake. You want a nice, uniform rise!
Step 3: Mix Wet Ingredients
In a large bowl, cream together the softened butter and granulated sugar until the mixture is light and fluffy. This usually takes about 3-5 minutes with an electric mixer. Beat in the eggs one at a time, making sure each one is fully incorporated before adding the next. Then, stir in the vanilla extract. In a separate small bowl or jug, lightly whisk the buttermilk.
Step 4: Combine
Now, we’ll add the dry ingredients and the buttermilk to the butter mixture, alternating between the two. Start by adding about a third of the dry ingredients and mix on low speed until just combined. Then, add half of the buttermilk and mix again. Continue alternating, ending with the dry ingredients. Be careful not to overmix here! We want a tender cake, and overmixing can lead to a tough texture. Just mix until you don’t see any more dry streaks. The batter will be thick.
Step 5: Prepare Filling
While your batter is resting, let’s get the cherry filling ready. In a small bowl, gently toss the cherries with the sugar, cornstarch, and lemon juice. Make sure the cherries are evenly coated. If you’re using frozen cherries, you might notice a bit more liquid; that’s perfectly fine. The cornstarch will help thicken it up as it bakes.
Step 6: Layer & Swirl
Spoon about half of the Cake Batter into your prepared pan and spread it out evenly. Sprinkle about half of the cherry mixture over the batter. Now, gently dollop the remaining batter over the cherries, trying to cover them as much as possible. Scatter the remaining cherries on top. At this point, you can use a knife or a skewer to gently swirl the cherries into the batter a bit. Don’t overdo it; we’re looking for lovely ribbons, not a uniform mix.
Step 7: Bake
Pop your pan into the preheated oven. Bake for 35-45 minutes, or until a wooden skewer or toothpick inserted into the center comes out clean. The cake should be golden brown around the edges and spring back lightly when touched. Oven temperatures can vary, so start checking around the 35-minute mark.
Step 8: Cool & Glaze
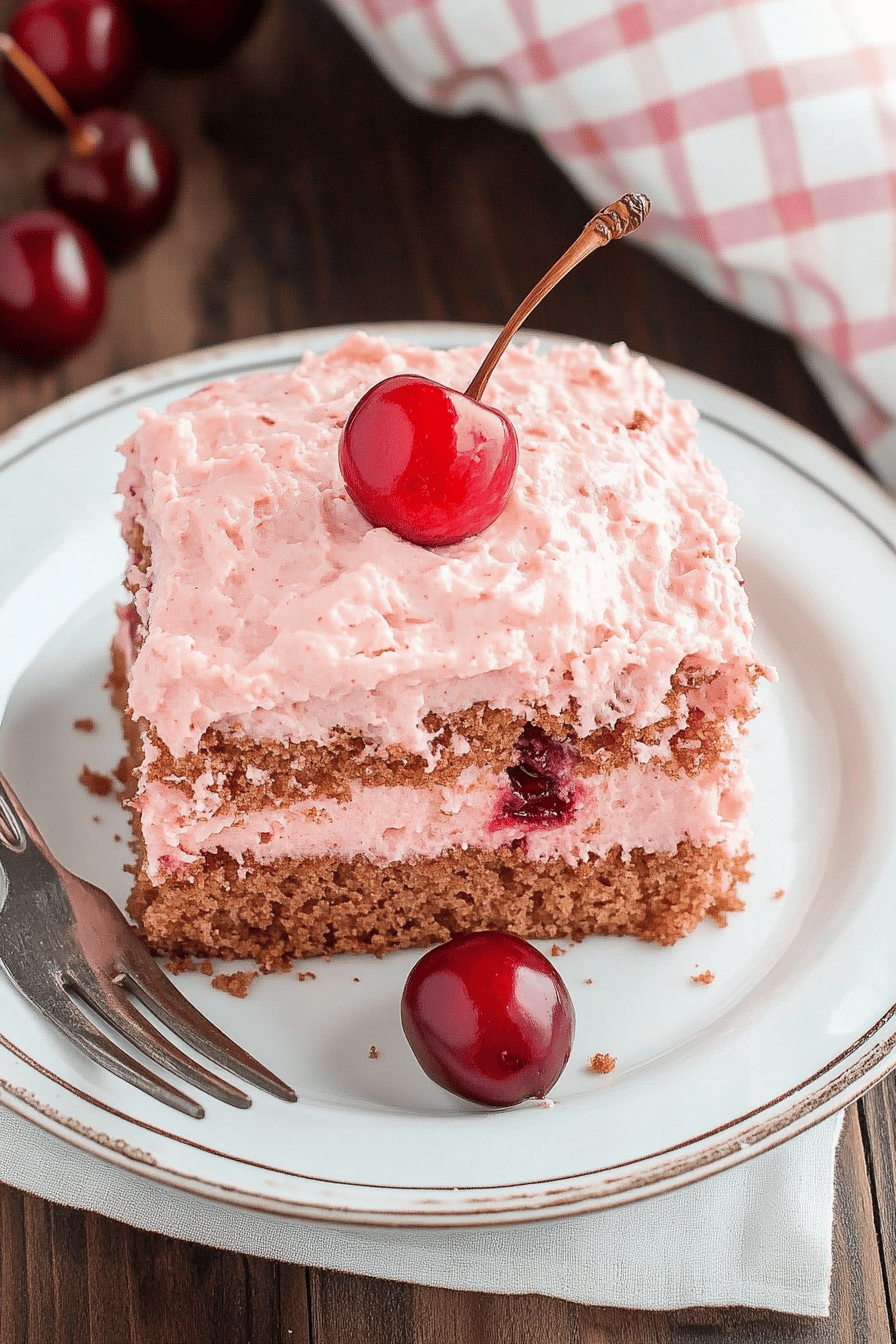
Once baked, let the cake cool in the pan on a wire rack for about 15-20 minutes. This is important so it doesn’t fall apart when you try to remove it. Then, carefully invert the cake onto the wire rack to cool completely. Once it’s fully cooled (and this is important for the glaze!), whisk together the sifted powdered sugar, milk or cherry juice, and vanilla extract in a small bowl until smooth. You want a pourable, but not too thin, consistency. Drizzle or spread the glaze evenly over the cooled cake. If you want a stronger cherry flavor and color in your glaze, use cherry juice instead of milk!
Step 9: Slice & Serve
Once the glaze has set a bit, slice your beautiful cherry cake into squares. This cake is delicious served at room temperature, but I also love it slightly warm. It’s perfect on its own, but a dollop of whipped cream or a scoop of vanilla Ice Cream never hurts!
What to Serve It With
This cherry cake is so wonderfully adaptable, it fits into almost any meal or occasion! For breakfast, it’s a real treat. I love a warm slice with a good cup of strong coffee. The sweetness is just enough to feel indulgent without being overwhelming for the morning. For brunch, it really shines. You can make it ahead of time and it looks so elegant on a brunch spread. Serve it alongside some fresh Fruit Salad, perhaps some scrambled eggs and bacon. A light, fruity mimosa or even a sparkling cider pairs beautifully. As a dessert, well, it’s a star! I often serve it with a side of vanilla bean ice cream or some lightly sweetened whipped cream. A drizzle of raspberry coulis can also add another layer of fruity goodness if you’re feeling fancy. And for those cozy snack times? It’s perfect just as it is, perhaps with a glass of milk or a cup of herbal tea. My family traditions often involve this cake during summer picnics, where its bright flavor just feels right. It’s also a lifesaver when unexpected guests pop over!
Top Tips for Perfecting Your Cherry Cake
Over the years, I’ve picked up a few tricks that I think really make this cherry cake sing. Here are some of my top tips:
Cherry Prep: Whether you’re using fresh or frozen cherries, make sure they’re pitted! If using fresh, wash them thoroughly. If using frozen, try not to let them thaw completely before mixing with the cornstarch and sugar. This helps prevent them from getting too mushy during baking and keeps the juices from making the cake batter too watery. I also find that slightly underripe cherries can offer a lovely tang that cuts through the sweetness beautifully.
Mixing Advice: The biggest mistake most home bakers make is overmixing the batter. Once you combine the wet and dry ingredients, mix only until *just* combined. A few tiny lumps are okay! Overmixing develops the gluten in the flour too much, resulting in a tough, dense cake. Use a low speed on your mixer, or even better, switch to a spatula and fold gently at the end.
Swirl Customization: When you’re swirling the cherries into the batter, think “gentle ribbons.” You don’t want to completely mix them in. Use a knife or a skewer and make a few gentle passes through the batter. This creates those beautiful, tempting streaks of cherry goodness without disturbing the cake structure too much. For a more dramatic look, you can reserve a small portion of the batter and color it pink with a tiny drop of food coloring before swirling it in. It’s a fun trick for special occasions!
Ingredient Swaps: I’ve experimented a lot! If you’re out of buttermilk, the milk-and-acid trick I mentioned earlier is a lifesaver. For a dairy-free version, you can use a good quality plant-based milk (almond or oat work well) and dairy-free butter sticks. I’ve also tried adding a touch of almond extract along with the vanilla, which pairs wonderfully with cherries. If you don’t have fresh or frozen cherries, good quality canned tart cherries (drained well) can also work in a pinch, though the flavor might be slightly less vibrant.
Baking Tips: Always preheat your oven properly. An oven thermometer is a great investment to ensure your oven is actually at the temperature it says it is. Place your cake pan in the center of the oven. To test for doneness, the skewer should come out clean or with a few moist crumbs attached, but no wet batter. If the top is browning too quickly, you can loosely tent it with aluminum foil for the remainder of the baking time.
Glaze Variations: The glaze recipe is very forgiving. If it’s too thick, add milk (or cherry juice!) a teaspoon at a time until you reach your desired consistency. If it’s too thin, gradually whisk in more sifted powdered sugar. For a tangier glaze, add a squeeze of fresh lemon juice. You can also omit the glaze entirely and simply dust the cooled cake with powdered sugar for a simpler, more rustic look.
Storing and Reheating Tips
Keeping this cherry cake delicious is pretty straightforward. If you have any leftovers (which is rare in my house!), here’s how I store them:
Room Temperature: Once completely cooled and the glaze has set, you can store the cake covered at room temperature for up to 2 days. Make sure it’s in an airtight container or well-covered with plastic wrap to prevent it from drying out. It maintains its lovely moisture this way.
Refrigerator Storage: For longer storage, up to 4-5 days, keep the cake in an airtight container in the refrigerator. The cooler temperature helps preserve it. When you’re ready to enjoy a slice, I always recommend letting it come back to room temperature for about 20-30 minutes before serving. It really brings out the best flavor and texture.
Freezer Instructions: Yes, you can freeze this cherry cake! Once completely cooled and glazed, wrap it tightly in a layer of plastic wrap, followed by a layer of aluminum foil or a freezer-safe bag. It should stay delicious in the freezer for up to 2-3 months. To thaw, unwrap it and let it come to room temperature on a wire rack, which usually takes a few hours. If you notice any condensation on the glaze while thawing, you can gently blot it with a paper towel.
Glaze Timing Advice: I always recommend glazing the cake *after* it’s completely cooled. If you glaze a warm cake, the glaze will melt and likely slide off. If you plan to freeze the cake, you can either freeze it without the glaze and add it after thawing, or glaze it and then freeze. Glazing before freezing can sometimes lead to a slightly stickier glaze upon thawing, but it still tastes delicious!
Frequently Asked Questions
Final Thoughts
This cherry cake recipe is truly one of my pride and joys. It’s more than just a dessert; it’s a little bit of comfort, a lot of flavor, and a whole lot of happy memories baked into one. It’s that perfect balance of sweet and tart, tender crumb and juicy cherries, all topped off with a simple, elegant glaze. Whether you’re a seasoned baker or just starting out, I promise you this recipe is achievable and incredibly rewarding. It’s the kind of cake that makes people ask for the recipe, and that’s always the best compliment, right? If you love this cherry cake, you might also enjoy my Moist Lemon Blueberry Bread or my Classic Chocolate Chip Cookies – they’re all part of my “easy wins” baking repertoire! I truly hope you give this cherry cake a try. I can’t wait to hear how yours turns out and what your family thinks!

Cherry Cake
Ingredients
Main Ingredients
- 2.5 cups all-purpose flour
- 1.5 cups granulated sugar
- 0.5 cup unsalted butter softened
- 3 large eggs
- 0.5 cup milk
- 1 teaspoon vanilla extract
- 2 teaspoons baking powder
- 0.5 teaspoon salt
- 2 cups fresh or frozen cherries pitted and halved
Instructions
Preparation Steps
- Preheat oven to 350°F (175°C). Grease and flour a 9-inch round cake pan.
- In a large bowl, cream together the softened butter and granulated sugar until light and fluffy.
- Beat in the eggs one at a time, then stir in the vanilla extract.
- In a separate bowl, whisk together the flour, baking powder, and salt.
- Alternately add the dry ingredients and the milk to the butter mixture, beginning and ending with the dry ingredients. Mix until just combined.
- Gently fold in the pitted cherries.
- Pour the batter into the prepared cake pan and spread evenly.
- Bake for 30-35 minutes, or until a wooden skewer inserted into the center comes out clean.
- Let the cake cool in the pan for 10 minutes before inverting it onto a wire rack to cool completely.