Oh, I am so excited to share this with you all today! This carrot cake loaf isn’t just a recipe; it’s practically a hug in baked-good form. It’s the kind of thing I whip up when I need a little comfort, a little something sweet to share, or honestly, just when that craving hits and I don’t want to deal with a full-blown layer cake. My kids, bless their hearts, go absolutely bonkers for it, and honestly, so do I. There’s something so wonderfully moist and flavorful about a good carrot cake, and this loaf version? It’s pure genius. It’s less fuss than a traditional cake, perfect for a quick breakfast treat, a delightful afternoon pick-me-up, or even a simple dessert after dinner. If you love the idea of a spiced, tender cake packed with wholesome goodness, then this carrot cake loaf is going to be your new best friend. It’s so much easier than you might think, and the results are just spectacular.
What is carrot cake?
So, what exactly is a carrot cake loaf? Well, think of it as your favorite decadent carrot cake, but streamlined for maximum ease and minimal fuss. Instead of the usual rounds you’d stack and frost, we’re baking it all up in one neat, beautiful loaf pan. It’s essentially all the amazing flavors and textures of a classic carrot cake – that delightful blend of warm spices like cinnamon and nutmeg, the natural sweetness from grated carrots, often a bit of nutty crunch from walnuts or pecans, and that signature moist crumb – all bundled into a portable, sliceable package. The name itself tells you pretty much all you need to know: it’s a carrot cake, baked in the shape of a loaf. It’s the kind of treat that feels both wholesome and indulgent, making it incredibly versatile. No fancy decorating required, just pure, unadulterated deliciousness!
Why you’ll love this recipe?
There are so many reasons why I keep coming back to this carrot cake loaf recipe, and I just know you’re going to fall in love with it too. First off, the flavor is just out of this world. We’re talking about a symphony of warm spices – cinnamon, nutmeg, maybe a pinch of ginger – that perfectly complement the subtle sweetness of the grated carrots. The carrots themselves add this incredible moisture and a lovely tender texture that you just can’t get from just flour and sugar. It’s not overly sweet, which I really appreciate; the sweetness comes naturally from the carrots and just a touch of sugar, making it feel a little more wholesome. And speaking of wholesome, it’s packed with those lovely shredded carrots, which makes me feel pretty good about having a slice (or two!) any time of day.
But beyond the incredible taste, the sheer simplicity is a lifesaver. I mean, who doesn’t love a recipe that comes together in one bowl (or very few bowls!) and bakes up beautifully in a single pan? It’s perfect for those busy weeknights when you want something homemade but don’t have hours to spare. And the cost-effectiveness? It uses pantry staples and affordable ingredients like carrots, flour, and eggs. You likely have most of it on hand right now! Plus, it’s so versatile. You can enjoy it plain, with a simple dusting of powdered sugar, or go for the CREAM CHEESE glaze – which, by the way, is divine. It’s honestly a fantastic alternative to a full-size cake if you’re craving that carrot cake flavor but want something a bit more casual. It’s the perfect companion for your morning coffee, a delightful addition to a brunch spread, or even a sweet finish to a meal. What I love most about this is that it feels so achievable, even for beginner bakers, yet the results are consistently impressive. It’s a true winner!
How do I make a carrot cake?
Quick Overview
Making this carrot cake loaf is surprisingly straightforward! You’ll essentially be mixing your dry ingredients in one bowl, your wet ingredients in another, combining them gently, folding in your glorious shredded carrots and any nuts or raisins, and then baking it to golden perfection in a loaf pan. The optional cream cheese glaze comes together in a flash while the loaf cools. It’s designed to be foolproof, delivering that moist, spiced, flavor-packed carrot cake experience with minimal effort. Trust me, you’ll be amazed at how easy it is to create such a delicious treat.
Ingredients
For the Main Batter:
You’ll need about 2 cups of all-purpose flour. I always opt for a good quality all-purpose flour, but if you’re feeling adventurous, you can try a 1:1 gluten-free blend; just be aware the texture might be slightly different. Make sure your flour is fresh! For leavening, we’ll use 1 teaspoon of baking soda and 1 teaspoon of baking powder – this combination gives us that perfect lift and tender crumb. Don’t forget the spices! 2 teaspoons of ground cinnamon are essential for that warm, cozy flavor. I also love to add ½ teaspoon of ground nutmeg and a pinch of ground cloves or ginger if I’m feeling fancy, but cinnamon alone is fantastic. A good pinch of salt, about ½ teaspoon, balances out all the sweetness. For sweetness, we’ll use 1 cup of granulated sugar. Some people prefer to use brown sugar for extra moisture and a caramel note, and that works beautifully too – you can use all brown, or a mix! And now for the star: 2 cups of finely shredded carrots. Make sure they’re finely shredded, not chunky, for the best texture. I always use fresh carrots; there’s no substitute for their vibrant flavor and moisture. And of course, 2 large eggs, at room temperature for better incorporation. 1 cup of vegetable oil (or any neutral-flavored oil like canola or grapeseed) is what gives this loaf its incredible moisture. You could also try melted unsalted butter, but oil really is the secret weapon here for that ultra-moist crumb. Finally, ½ cup of buttermilk (or 1/2 cup milk with ½ teaspoon lemon juice or vinegar, let it sit for 5 minutes) adds tenderness and a slight tang. If you don’t have buttermilk, the milk-and-acid trick is a lifesaver!
For the Filling:
This is where we amp up the flavor and texture! You can absolutely omit these if you prefer a simpler loaf, but I highly recommend them. I love to add ½ cup of chopped walnuts or pecans. Toasting them lightly beforehand really brings out their nutty flavor, but it’s optional. I also sometimes toss in ½ cup of raisins or dried cranberries, especially if I’m making this around the holidays. If you do add raisins, a little soak in warm water for about 10 minutes can help plump them up before adding them to the batter.
For the Glaze:
This glaze is simple, classic, and utterly delicious. You’ll need 4 ounces of cream cheese, softened to room temperature. Make sure it’s good quality cream cheese – it makes a difference! Then, 1 cup of powdered sugar, sifted to avoid lumps. A teaspoon of vanilla extract adds a lovely depth of flavor. And finally, a tablespoon or two of milk or heavy cream, to get the consistency just right. You want it pourable but not too thin.
Step-by-Step Instructions
Step 1: Preheat & Prep Pan
First things first, let’s get our oven ready and our pan prepped. Preheat your oven to 350°F (175°C). This temperature is just perfect for baking a loaf cake evenly. Now, grab a standard 9×5 inch loaf pan. I like to grease it really well with butter or non-stick cooking spray, and then lightly flour it. For extra insurance against sticking, I sometimes lay a strip of parchment paper across the bottom and up the two long sides, leaving a little overhang. This makes lifting the loaf out so much easier once it’s baked. Just press the parchment into the greased pan, and it should stick. Make sure the overhang is even on both sides – that’s your “handle” for lifting!
Step 2: Mix Dry Ingredients
In a large mixing bowl, we’re going to whisk together our dry ingredients. This is where we combine the 2 cups of all-purpose flour, 1 teaspoon of baking soda, 1 teaspoon of baking powder, 2 teaspoons of cinnamon, ½ teaspoon of nutmeg, and ½ teaspoon of salt. Whisking them thoroughly ensures that the leavening agents and spices are evenly distributed throughout the batter, which means a consistently delicious rise and flavor in every slice. You don’t want pockets of too much spice or baking soda! Make sure there are no clumps of flour or spices.
Step 3: Mix Wet Ingredients
In a separate medium bowl, we’ll combine the wet ingredients. This is pretty simple: whisk together the 2 large eggs, 1 cup of vegetable oil, and ½ cup of buttermilk. If you don’t have buttermilk, remember that trick: ½ cup of milk mixed with ½ teaspoon of lemon juice or white vinegar, let it sit for about 5 minutes until it looks slightly curdled. This makes a lovely homemade buttermilk substitute. Whisk until everything is well combined and slightly frothy. It doesn’t need to be super vigorous, just a good mix.
Step 4: Combine
Now for the magic moment – bringing it all together! Pour the wet ingredients into the bowl with the dry ingredients. Using a spatula or a wooden spoon, gently fold the wet into the dry until *just* combined. Seriously, this is crucial! Overmixing is the enemy of a tender cake. You want to see just a few streaks of flour remaining. Don’t try to get it perfectly smooth; that’s what the next step is for. Overmixing develops the gluten too much, leading to a tough, dense cake, and we want a light, fluffy loaf!
Step 5: Prepare Filling
This is where we add all those delightful additions. If you’re using them, gently fold in your 2 cups of finely shredded carrots and your ½ cup of chopped nuts or raisins. Again, fold them in gently with your spatula until they’re just distributed. Don’t overmix here either! The goal is to incorporate them evenly without deflating the batter or overworking the gluten. You should start to see that beautiful orange flecked with nuts and raisins – it looks so promising!
Step 6: Layer & Swirl
Spoon the batter evenly into your prepared loaf pan. You can smooth the top a bit with your spatula, or leave it a little rustic – it’s all good! If you’re feeling fancy and want a little swirl effect, you can sometimes reserve a tablespoon of batter, mix in a little extra cinnamon or a touch of cocoa powder, and then dollop and swirl it on top. For this recipe, it’s usually just a straightforward pour and smooth. Ensure the batter is evenly distributed in the pan so it bakes evenly.
Step 7: Bake
Pop that loaf pan into your preheated oven. Bake for 50-65 minutes. The exact time will depend on your oven, of course. How do you know it’s done? The best way is to insert a toothpick or a thin skewer into the center of the loaf. If it comes out clean, or with just a few moist crumbs attached (not wet batter!), it’s ready. The top should be golden brown and the edges should start to pull away slightly from the sides of the pan. If the top is browning too quickly before the inside is cooked, you can loosely tent it with aluminum foil for the last 15-20 minutes of baking.
Step 8: Cool & Glaze
Once it’s baked, carefully remove the loaf pan from the oven and let it cool in the pan on a wire rack for about 15-20 minutes. This is important! It allows the cake to firm up a bit before you try to remove it. After that initial cooling, use the parchment paper overhangs (if you used them) or carefully invert the pan onto the wire rack to remove the loaf. Let it cool completely on the wire rack. This can take a couple of hours. It needs to be fully cool before you attempt to glaze it, otherwise, the glaze will melt right off! While it’s cooling, whip up the glaze: beat the softened cream cheese until smooth, then beat in the sifted powdered sugar, vanilla extract, and a tablespoon of milk. Add more milk, a teaspoon at a time, until you reach your desired drizzling consistency. Once the loaf is completely cool, drizzle or spread the glaze over the top. Let the glaze set for a bit before slicing.
Step 9: Slice & Serve
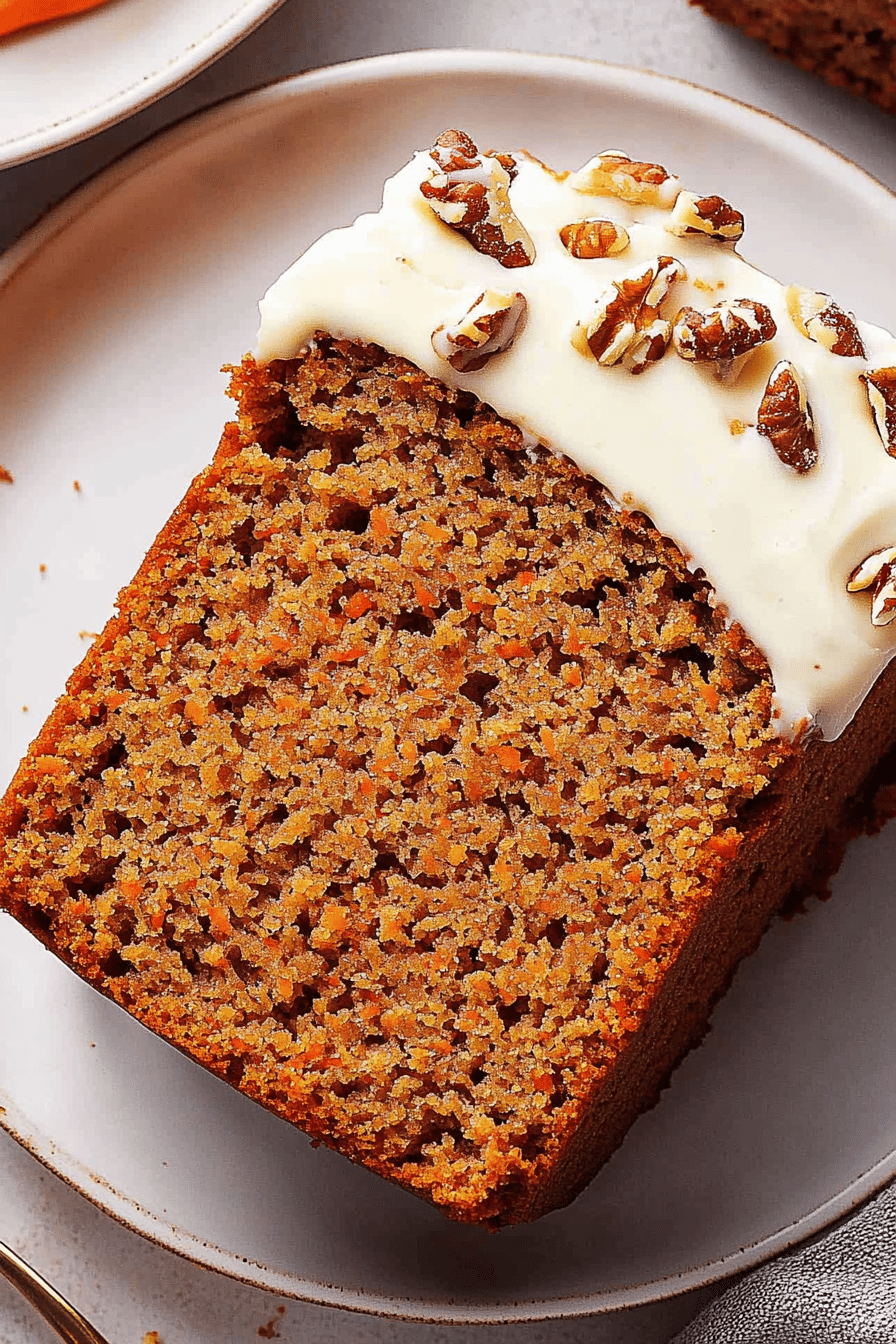
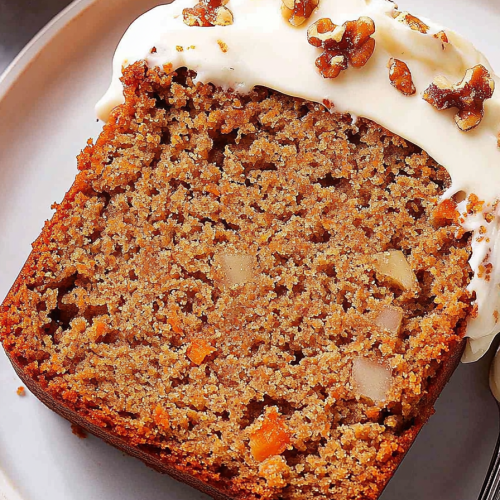
Once the glaze has set, it’s time for the best part! Use a sharp serrated knife to slice the carrot cake loaf. A serrated knife helps prevent the glaze from cracking and gives you cleaner slices. Serve at room temperature for the best flavor and texture. I love seeing the beautiful swirl of orange and spice in each slice. It’s truly a masterpiece of simple baking!
What to Serve It With
This carrot cake loaf is so wonderfully versatile, it fits in everywhere! For breakfast, it’s a divine treat alongside a steaming mug of coffee or a refreshing glass of orange juice. I sometimes toast a thick slice and spread a little extra cream cheese on it for a decadent start to the day. For brunch, it’s a showstopper! Serve slices arranged artfully on a platter, perhaps with a dollop of Greek yogurt and some fresh berries on the side. It pairs beautifully with other brunch favorites like quiche or a fruit salad. For dessert, it’s a comforting classic. A warm slice, perhaps with a scoop of vanilla bean Ice Cream or a drizzle of extra glaze, is pure bliss. It’s also just perfect for those cozy afternoon or evening snacks. Imagine curling up with a book and a slice of this, maybe with a cup of tea. It’s the ultimate comfort food. My family has a tradition of having this on the first day of fall, it just feels so cozy and appropriate. I’ve also found it pairs wonderfully with a chai latte, amplifying those warm spice notes. It truly is a treat for any time of day, for any occasion!
Top Tips for Perfecting Your Carrot Cake Loaf
I’ve made this carrot cake loaf so many times, I’ve learned a few tricks along the way that I think will really help you nail it every single time. Let’s talk about the carrots first. For the best texture and moisture, always use finely shredded carrots. A box grater works perfectly, or you can pulse them briefly in a food processor. Avoid pre-shredded carrots from the store if you can; they tend to be drier. And don’t wring out the moisture from the shredded carrots! That natural moisture is key to a Super Moist loaf. It’s what makes this carrot cake loaf so wonderfully tender.
When it comes to mixing, remember that gentle touch I mentioned. Overmixing is the absolute biggest culprit for a tough cake. Mix the wet and dry ingredients until they are *just* combined. A few little streaks of flour are perfectly fine – they’ll disappear during baking. And when you fold in the carrots and nuts, be equally gentle. You want to incorporate them without deflating the batter. For the swirl effect, if you’re not seeing a natural swirl from the carrots, you can sometimes reserve a tablespoon of batter, mix it with a little cocoa powder or extra spice, then dollop and gently swirl it on top before baking. It’s mostly for looks, but it’s fun!
Ingredient swaps are my jam! If you’re out of buttermilk, the milk-and-acid trick is your best friend – it really does make a difference in tenderness. For nuts, pecans and walnuts are classic, but slivered almonds or even macadamia nuts could work. If you don’t like nuts, just omit them or add more raisins or chocolate chips! Speaking of chocolate chips, a ½ cup of mini chocolate chips folded in with the carrots is pure heaven. For the oil, while vegetable oil is my go-to for supreme moisture, melted coconut oil can work but might lend a subtle coconut flavor. Unsalted butter, melted and cooled, can also be used, but the texture will be slightly less moist than with oil. For baking, if your oven runs hot, consider reducing the temperature by 25°F (about 10°C) and checking for doneness a little earlier. And always, always do the toothpick test – it’s the most reliable way to tell if your loaf is baked through.
Finally, the glaze. If you want a thicker glaze, use less milk. For a thinner, more pourable glaze, add a touch more milk. You can also add a pinch of cinnamon or a tiny bit of orange zest to the cream cheese glaze for an extra flavor boost. If you prefer not to use a cream cheese glaze, a simple dusting of powdered sugar is lovely, or even a thin layer of apricot jam warmed slightly and brushed on.
Storing and Reheating Tips
This carrot cake loaf is pretty forgiving when it comes to storage, which is one of the things I love about it. If you’ve glazed it and it’s sitting out on the counter, I usually keep it for about 2-3 days. Make sure it’s covered well with plastic wrap or placed in an airtight container. The glaze helps protect the top, and the oil in the cake keeps it moist. If it’s not glazed, it can generally last at room temperature for up to 3 days, but it will be at its absolute freshest within the first 2 days.
For longer storage, the refrigerator is your best bet. Once it’s completely cooled (and glazed!), wrap it tightly in plastic wrap, then in aluminum foil, or place it in an airtight container. It should stay good in the fridge for up to a week. The texture might become a little firmer when cold, which is normal. When you’re ready to enjoy a slice from the fridge, I highly recommend letting it come to room temperature for about 20-30 minutes before serving for the best flavor and texture. Some people even like to gently warm a slice in the microwave for about 10-15 seconds – it brings out that lovely spiced aroma and makes it extra comforting!
Freezing this carrot cake loaf is also totally doable and a great way to have it on hand for future cravings. Once it’s completely cooled, wrap the entire un-glazed loaf tightly in plastic wrap, then in aluminum foil. You can also freeze individual slices this way. It will keep well in the freezer for up to 2-3 months. To thaw, remove it from the freezer and let it thaw overnight in the refrigerator, then bring it to room temperature. If you’ve frozen it un-glazed, you can make a fresh glaze or simply dust it with powdered sugar once thawed. For glazed loaves, it’s best to freeze them un-glazed and add the glaze after thawing for the freshest appearance and taste.
A little note on glaze timing: if you plan to freeze the loaf, it’s best to freeze it *without* the glaze. Apply the glaze after thawing and bringing it to room temperature. If you’re just storing it in the fridge or at room temperature for a few days, glazing it beforehand is perfectly fine!
Frequently Asked Questions
Final Thoughts
So there you have it – my absolute favorite carrot cake loaf recipe! I really hope you give this one a try because it truly is special. It’s that perfect balance of moist, tender crumb, warm spice, and just the right amount of sweetness, all wrapped up in an incredibly easy-to-make package. It’s the kind of recipe that feels like a treat but is also wholesome enough for everyday enjoyment. Whether you’re looking for a delightful breakfast bake, a crowd-pleasing brunch addition, or just a comforting dessert, this carrot cake loaf delivers every single time. It’s a recipe that has brought so much joy to my kitchen, and I’m so happy to share it with you.
If you love this recipe, you might also enjoy my Double Chocolate Zucchini Bread (a hidden veggie gem!) or my Classic Lemon Poppy Seed Loaf for another easy, delicious baking project. I can’t wait to hear what you think of this carrot cake loaf! Please leave a comment below with your thoughts, any variations you tried, or how your family enjoyed it. Ratings are also super helpful for other bakers! Happy baking, my friends!
carrot cake loaf
Ingredients
Cake Ingredients
- 2.5 cup all-purpose flour
- 2 teaspoon baking soda
- 0.5 teaspoon salt
- 1.5 teaspoon ground cinnamon
- 0.5 teaspoon ground nutmeg
- 0.25 teaspoon ground ginger
- 1.5 cup granulated sugar
- 0.5 cup vegetable oil
- 4 large eggs
- 0.33 cup unsweetened applesauce
- 2 teaspoon vanilla extract
- 2 cup grated carrots
- 0.5 cup chopped walnuts or pecans optional
Cream Cheese Frosting
- 8 ounces cream cheese, softened
- 0.5 cup unsalted butter, softened
- 3 cup powdered sugar
- 1 teaspoon vanilla extract
Instructions
Preparation Steps
- Preheat oven to 350°F (175°C). Grease and flour a 9x5 inch loaf pan.
- In a large bowl, whisk together the flour, baking soda, salt, cinnamon, nutmeg, and ginger. Set aside.
- In a separate large bowl, whisk together the granulated sugar and vegetable oil until well combined. Beat in the eggs one at a time, then stir in the applesauce and vanilla extract.
- Gradually add the dry ingredients to the wet ingredients, mixing until just combined. Do not overmix.
- Fold in the grated carrots and optional nuts.
- Pour the batter into the prepared loaf pan and spread evenly.
- Bake for 50-60 minutes, or until a wooden skewer inserted into the center comes out clean.
- Let the cake cool in the pan for 10-15 minutes before inverting it onto a wire rack to cool completely.
- While the cake cools, prepare the frosting. In a medium bowl, beat together the softened cream cheese and butter until smooth and creamy.
- Gradually add the powdered sugar, beating until well combined and smooth. Stir in the vanilla extract.
- Once the cake is completely cool, spread the cream cheese frosting evenly over the top.