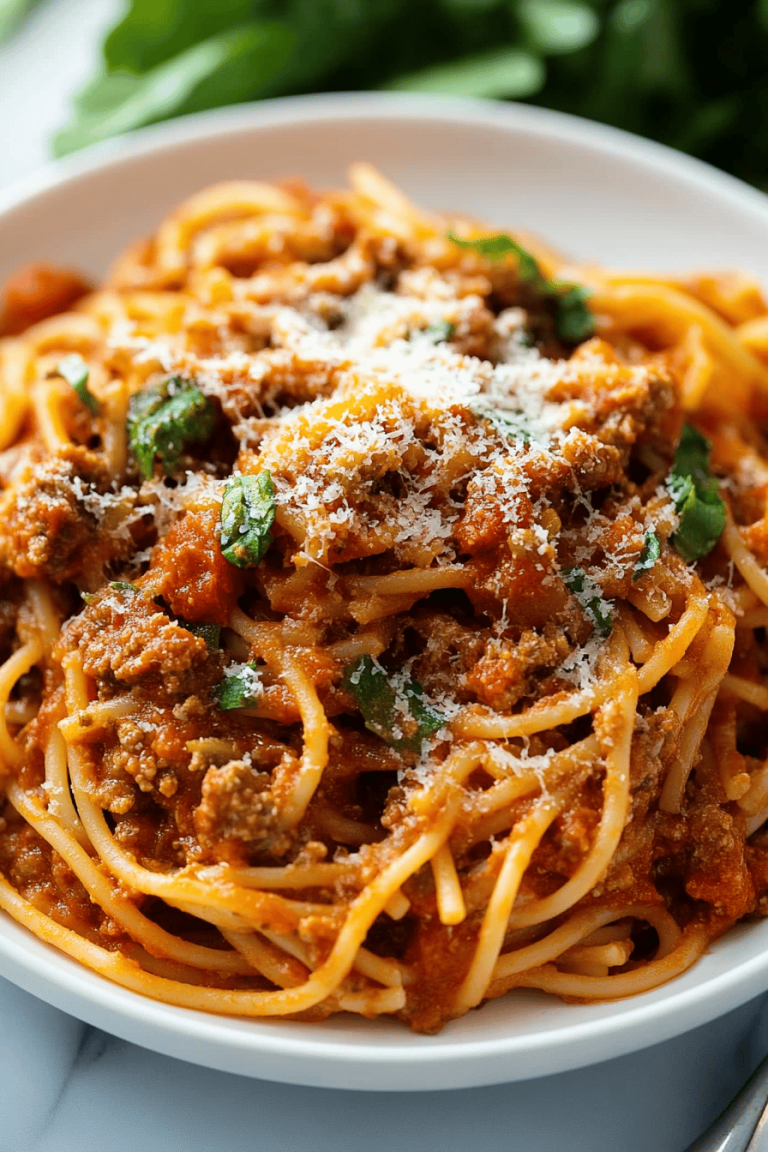
Oh, you guys, I’m so excited to share this with you today. It’s one of those recipes that, when I make it, the whole house just lights up. You know those meals that just feel like a hug? This is it for me. My kids, bless their hearts, will devour this faster than you can say “seconds, please!” And honestly, it’s not just for them. On a Friday night, when I’m craving something that feels special but I’m too tired to do anything complicated, this beer battered fish is my absolute go-to. It reminds me of those seaside fish and chip shops we used to visit on family holidays when I was a kid, that wonderful smell of hot oil and vinegar hanging in the air. But I promise you, making it at home is totally doable and, dare I say, even better because you know exactly what goes into it. Forget those soggy, greasy versions you sometimes get; this is the real deal, golden brown and impossibly crispy. It’s truly my favorite way to enjoy fish, and I can’t wait for you to try it!
What is beer battered fish?
So, what exactly are we talking about when we say “beer battered fish”? At its heart, it’s simple: fish fillets that have been dipped in a batter made with beer and then fried until they’re beautifully golden and crunchy. Think of it as a delightful transformation – humble pieces of fish become these glorious, almost cloud-like morsels wrapped in a shatteringly crisp shell. The “beer” part isn’t just for show; it’s what gives the batter its lift and its unique, subtle flavor. The carbonation in the beer creates tiny bubbles that make the batter light and airy as it cooks, leading to that incredible crunch. It’s essentially fish meets a fantastic, flavorful coating, and the result is pure magic. It’s a classic for a reason, and once you nail it at home, you’ll understand why it’s a beloved dish all over the world.
Why you’ll love this recipe?
There are so many reasons why this beer battered fish recipe has earned a permanent spot in my recipe binder, and I know you’re going to fall in love with it too! First off, the flavor is just out of this world. You get that perfectly flaky, tender fish inside, contrasted with the most amazing, savory crunch of the batter. It’s got a hint of maltiness from the beer that you just can’t replicate any other way, and it’s not heavy or greasy at all. And the simplicity! Honestly, this is a lifesaver on busy nights. I used to think making anything deep-fried was a chore, but this batter comes together so quickly, and the cooking process is actually really straightforward once you get the hang of it. Plus, it’s surprisingly budget-friendly! Using common pantry staples and affordable white fish fillets means you can have a restaurant-quality meal without breaking the bank. What I love most about this is its versatility; it’s not just for a special Friday night dinner. It’s fantastic served with chips for a proper fish and chips night, but it’s also surprisingly elegant when paired with a fresh salad or some roasted vegetables. It truly stands up to some of my other favorite comfort food recipes, like my [link to creamy macaroni and cheese recipe] or my [link to quick homemade Pizza Dough recipe], because it’s just so satisfying and crowd-pleasing. This recipe is a winner, plain and simple!
How do you make beer battered fish?
Quick Overview
Making this beer battered fish is a breeze, really! You’ll whip up a simple batter using flour, a few seasonings, and your favorite beer. Then, you’ll coat your fish fillets and fry them until they’re golden and crispy. The key is getting your oil temperature just right and not overcrowding the pan, which ensures that glorious crunch we’re all after. It’s a surprisingly quick process, meaning you can have this incredibly delicious meal on the table in under 30 minutes from start to finish. It’s the kind of recipe that makes you feel like a kitchen wizard, even if you’ve never deep-fried anything before!
Ingredients
For the Main Batter:
You’ll need 1 ½ cups of all-purpose flour, plus a little extra for dusting the fish. I always reach for unbleached all-purpose flour because I find it gives a slightly better texture. Then, we need 1 teaspoon of baking powder – this is crucial for that light, airy crispness. A good pinch of salt (about ½ teaspoon) and ¼ teaspoon of Black Pepper are essential for flavor, but feel free to add a little more if you like it a bit punchier. For the liquid, it’s ½ cup of ice-cold lager or pale ale. The colder the beer, the better the batter! I usually have a bottle or can chilling in the fridge. You can also use sparkling water if you’re avoiding alcohol, but the beer really does add a lovely depth of flavor.
For the Filling:
Here’s where we talk fish! You’ll need about 1 ½ pounds of firm white fish fillets. My absolute favorites for this are cod or haddock because they’re mild and flake beautifully. Halibut is also wonderful if you’re feeling fancy. Just make sure they’re nice and firm, not too thin. You can buy them in one large piece and cut them into serving portions, or buy individual portions. I usually cut mine into pieces about 4-6 ounces each. You’ll also want a little extra flour for dusting the fish before battering – this helps the batter stick. A splash of lemon juice is lovely for serving, and some salt and pepper to season the fish itself before dusting.
For the Glaze:
While this recipe isn’t strictly a “glazed” dish in the traditional sense (we’re talking about batter-fried fish here, not cake!), I like to think of the final deliciousness as its own kind of “glaze” of flavor. So, there isn’t a separate glaze recipe here. Instead, the magic comes from the perfectly cooked, golden batter itself. However, if you *were* looking for a sauce to go with it, a simple tartar sauce or a squeeze of fresh lemon is always my go-to. You could even mix some chopped fresh dill and chives into your tartar sauce for an extra burst of flavor!
Step-by-Step Instructions
Step 1: Preheat & Prep Pan
First things first, let’s get our frying situation sorted. You’ll need a heavy-bottomed pot or a deep skillet. Fill it with about 2-3 inches of neutral oil, like vegetable, canola, or peanut oil. We want to heat this up to 350°F (175°C). A good kitchen thermometer is your best friend here; it makes all the difference in getting that perfect crispy coating without burning the outside or leaving the inside raw. If you don’t have a thermometer, you can test the oil by dropping a tiny bit of batter in; it should sizzle vigorously and float to the top right away. While the oil heats up, pat your fish fillets completely dry with paper towels. This is super important for a good crust! Season them lightly with salt and pepper, then dust them with a little bit of flour. Just a light coating is all you need; this helps the batter adhere beautifully.
Step 2: Mix Dry Ingredients
In a medium-sized bowl, whisk together the 1 ½ cups of all-purpose flour, the baking powder, salt, and pepper for the batter. Make sure everything is well combined. I like to give it a good whisk to aerate the flour a bit, which I think contributes to a lighter batter. You want a nice, even mixture so all the leavening and seasoning are distributed perfectly. Don’t skip this step! It’s the foundation of our amazing crispy coating.
Step 3: Mix Wet Ingredients
Now for the magic liquid! Grab your ice-cold beer. I like to pour about half of it into a separate bowl or measuring cup, and then I’ll gradually add the rest to the dry ingredients. The key here is keeping it cold. If your beer is warm, the batter won’t be as light and crispy. You can even pop your bowl of beer into the freezer for about 10 minutes before you start mixing if your kitchen is warm. Just make sure it’s not frozen solid!
Step 4: Combine
This is where it all comes together! Pour the cold beer into the bowl with the dry ingredients. Whisk gently until just combined. It’s really important not to overmix. You want a batter that’s thick but still pourable, with some lumps. Seriously, a few lumps are good! Overmixing develops the gluten in the flour, which can lead to a tough, chewy batter instead of a light, crispy one. It should have the consistency of pancake batter, maybe a touch thicker. If it seems too thick, add a splash more beer; if it’s too thin, add a tiny bit more flour. The batter should coat the back of a spoon nicely.
Step 5: Prepare Filling
This step is actually already done in Step 3 where we seasoned and dusted our fish! So, consider this a confirmation that your fish is ready to go, seasoned and lightly floured, sitting patiently for its turn in the batter.
Step 6: Layer & Swirl
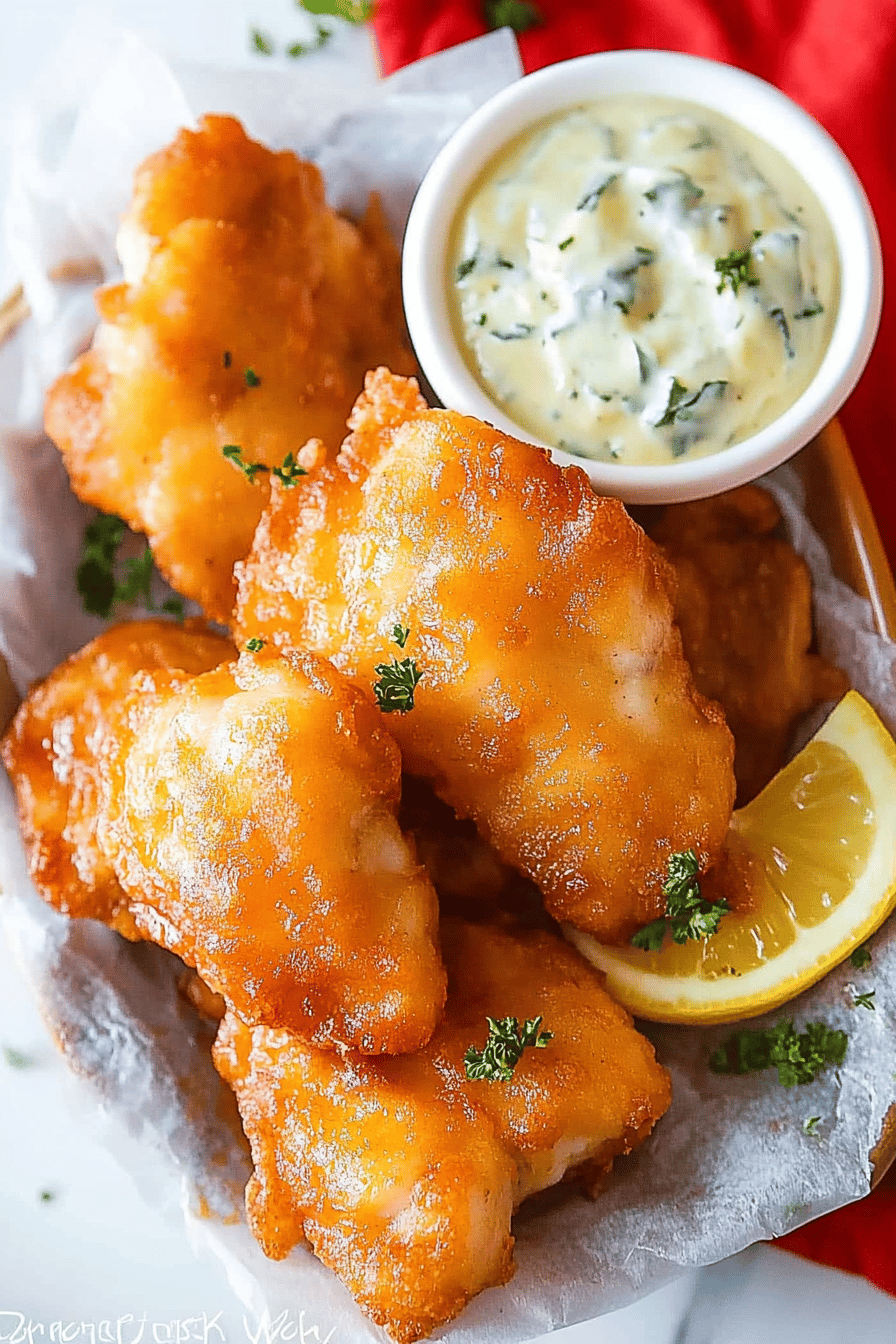
Okay, we’re about to fry! Grab your floured fish fillets. Dip each piece of fish into the beer batter, making sure it’s fully coated. Let any excess batter drip off for a second – you don’t want huge globs of batter. Then, carefully lower the battered fish into the hot oil. Don’t crowd the pan! Fry only 2-3 pieces at a time, depending on the size of your skillet. Overcrowding will lower the oil temperature, resulting in soggy fish. You want them to have plenty of room to get beautifully golden and crispy. They’ll need about 4-5 minutes per side, or until they are a deep golden brown and float to the surface. You’ll see little bubbles forming and rising around them as they cook – that’s a good sign!
Step 7: Bake
Wait, bake? No baking here! We’re frying! The cooking process is all done in that hot oil. So, once your fish is a beautiful golden brown and cooked through, carefully remove it from the oil using a slotted spoon or tongs. Let any excess oil drip back into the pot. Place the cooked fish on a wire rack set over a baking sheet. This is crucial! Placing it directly on paper towels can steam the bottom and make it less crispy. The wire rack allows air to circulate, keeping that perfect crunch. Continue frying the remaining fish in batches, making sure to let the oil temperature come back up to 350°F (175°C) between batches.
Step 8: Cool & Glaze
The fish is best served immediately while it’s piping hot and super crispy. As mentioned, there’s no literal “glaze” for this beer battered fish in the way you might think of a cake. The “glaze” is the gorgeous, golden, perfectly crisp batter that encases the fish. The moment it comes out of the oil, it’s at its peak! If you absolutely must hold it for a few minutes, you can keep it on the wire rack in a warm oven (around 200°F/95°C), but honestly, it’s so good fresh out of the fryer, I always aim to serve it right away. The magic is in that immediate crunch.
Step 9: Slice & Serve
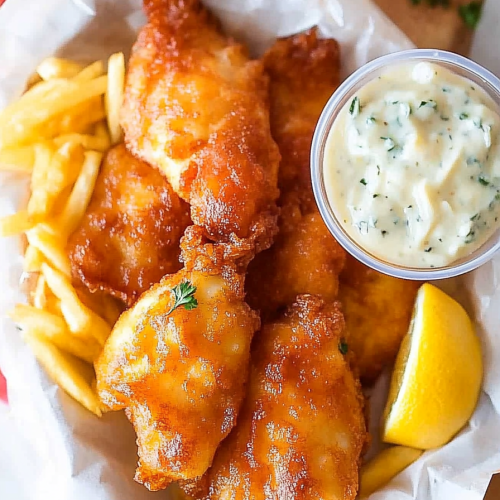
Once your fish is fried to perfection and resting on the wire rack, you’re ready to serve! If you’ve fried larger pieces, you can carefully slice them in half before serving, revealing the flaky white fish inside. Serve immediately while it’s hot and crispy. A squeeze of fresh lemon juice over the top is heavenly, and a side of classic tartar sauce is a must for many. Don’t forget a sprinkle of flaky sea salt if you love that extra bit of texture and flavor!
What to Serve It With
This beer battered fish is so wonderfully versatile, it can truly anchor any meal! For a proper, no-holds-barred fish and chips experience, of course, you can’t beat serving it alongside thick-cut, golden fries (or “chips” as we call them across the pond!). A dollop of creamy, homemade tartar sauce is non-negotiable for this classic pairing, and a side of mushy peas or a simple vinegar-soaked pickled onion rounds out the ultimate comfort meal. On a slightly lighter note, this battered fish is also fantastic served over a big, vibrant salad. Think mixed greens, cherry tomatoes, cucumber, and maybe some thinly sliced red onion, all tossed with a zesty lemon vinaigrette. The crisp batter adds amazing texture to a fresh salad. It’s also surprisingly good crumbled over some steamed rice with a drizzle of soy sauce and a sprinkle of sesame seeds for a quick, Asian-inspired twist. My kids also love it tucked into warm tortillas with shredded lettuce and a squeeze of lime for make-shift fish tacos. It’s a real crowd-pleaser, and it always disappears quickly!
Top Tips for Perfecting Your Beer Battered Fish
Alright, let’s talk about getting this *just right*. Over the years, I’ve picked up a few tricks that make all the difference, and I’m happy to share them with you! First, about the fish prep: always, always, *always* pat your fish fillets completely dry with paper towels. Moisture is the enemy of crispiness, both for the fish itself and for getting that batter to stick well. Seasoning the fish directly before dusting it with flour helps the seasoning adhere. For the batter consistency, remember that a few lumps are your friend! Overmixing is the most common mistake people make, and it leads to a tough batter. Aim for a thick but pourable consistency, like pancake batter. If it’s too thin, your batter will slide right off; too thick, and it’ll be doughy. The beer: I can’t stress enough how important it is to use ice-cold beer. The carbonation reacts with the hot oil to create steam, which puffs up the batter and makes it super crispy. If you don’t drink alcohol, you can absolutely use ice-cold sparkling water or club soda, but I find the beer adds a subtle, lovely depth of flavor that really elevates the dish. When it comes to frying, the oil temperature is king. Too low, and your fish will absorb too much oil and be greasy. Too high, and the outside will burn before the inside is cooked. Use a thermometer if you have one; 350°F (175°C) is the sweet spot. And please, don’t overcrowd the pan! Fry in batches. It’s worth the extra few minutes to get that perfect crisp. Lastly, drain your fish on a wire rack, not paper towels. This allows air to circulate underneath, keeping the bottom crispy. Trust me on this one – it’s a game-changer!
Storing and Reheating Tips
Okay, so the absolute best way to enjoy this beer battered fish is fresh and hot right out of the fryer. That incredible crunch just doesn’t last forever. However, if you happen to have leftovers (which is rare in my house!), here’s how to handle them. For short-term storage, let the cooked fish cool completely on a wire rack. Once cooled, place it in an airtight container in the refrigerator. It should stay good for about 1 to 2 days. When it comes to reheating, the goal is to bring back that crispiness. The microwave is generally not your friend here, as it tends to make things soggy. Your best bet is to reheat it in a single layer on a baking sheet in a preheated oven at around 375°F (190°C) for about 8-10 minutes, or until heated through and the coating is re-crisped. You could also try reheating it in an Air Fryer for a few minutes at 350°F (175°C). If you’re looking for a quick fix, a toaster oven works wonders too. For the best results, reheat just before you plan to eat it. Unfortunately, freezing this battered fish isn’t really recommended. The batter tends to get a bit soggy and lose its signature crunch upon thawing and reheating, so I’d save this one for when you can enjoy it fresh!
Frequently Asked Questions
Final Thoughts
Honestly, making this beer battered fish at home is one of those kitchen victories that just makes you feel good. It’s proof that you don’t need to be a professional chef to create something truly spectacular and incredibly satisfying. The combination of flaky, tender fish with that impossibly crispy, golden batter is something everyone should experience. It’s comforting, it’s delicious, and it’s surprisingly easy to achieve. This recipe is a testament to how simple ingredients, when treated with a little care and attention, can create something truly magical. If you love this, you might also enjoy my other favorite crispy recipes, like my [link to crispy oven Baked Chicken wings] or my [link to perfect french fries]. Give this beer battered fish a try – I promise it won’t disappoint! I can’t wait to hear how yours turns out! Please leave a comment below and let me know what you think, or share your own favorite variations!
Classic Beer Battered Fish
Ingredients
Fish
- 0.68 kg white fish fillets such as cod, haddock, or tilapia
Batter
- 1.5 cup all-purpose flour
- 0.5 cup cornstarch
- 0.5 teaspoon baking powder
- 0.5 teaspoon salt
- 0.25 teaspoon black pepper
- 355 ml lager beer, cold
For Frying
- 1 liter vegetable oil or other high-smoke point oil
Instructions
Preparation Steps
- Pat the fish fillets dry with paper towels and cut them into serving-sized pieces.
- In a medium bowl, whisk together the flour, cornstarch, baking powder, salt, and pepper.
- Gradually whisk in the cold beer until a smooth batter forms. It should be thick but pourable.
- Heat the vegetable oil in a deep skillet or Dutch oven to 190 degrees C (375 degrees F).
- Dip each piece of fish into the batter, ensuring it's fully coated. Let any excess batter drip off.
- Carefully place the battered fish into the hot oil, working in batches to avoid overcrowding the pan.
- Fry for about 3-5 minutes per side, until golden brown and cooked through. The cooking time will vary depending on the thickness of the fish.
- Remove the fish from the oil with a slotted spoon and place it on a wire rack set over a baking sheet to drain.
- Serve hot with your favorite sides like fries, coleslaw, or tartar sauce.