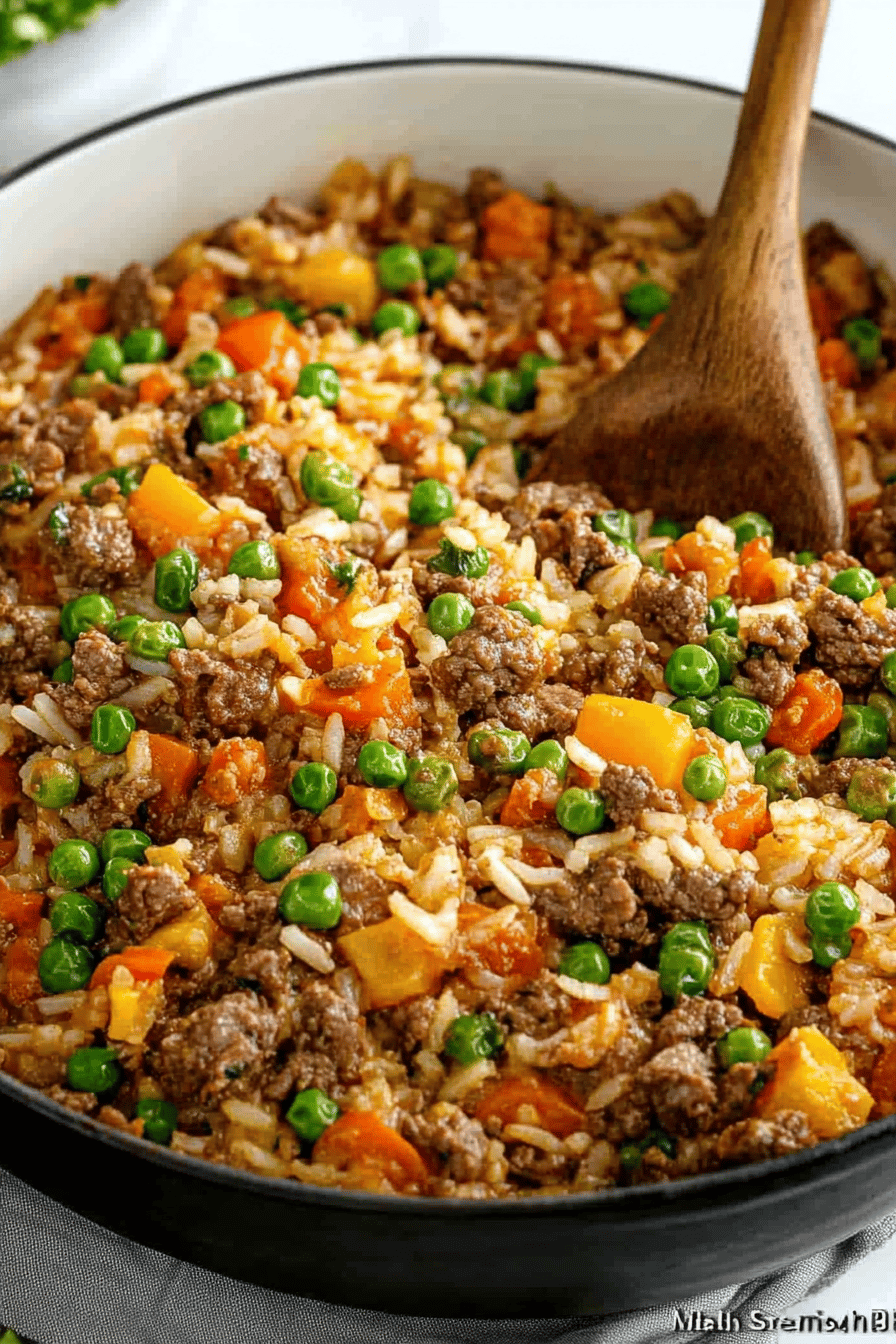
Oh, this beef and rice recipe! It’s one of those dishes that just feels like a warm hug on a plate. I remember the first time I made it for my family, I was a little nervous because my husband is a bit of a picky eater, especially when it comes to new things. But this? This beef and rice recipe disappeared in minutes! My kids actually ask for seconds, which, as any parent knows, is basically a culinary gold medal. It’s not fancy, it’s not complicated, but it’s SO satisfying. It’s the kind of meal that makes you want to curl up on the couch with a good book and just savor every single bite. If you’re looking for a comforting, flavorful, and surprisingly easy meal that hits all the right notes, you’ve found it. This beef and rice recipe is seriously a lifesaver on busy weeknights, but it’s also special enough for a relaxed weekend dinner. It’s kind of like a savory rice pudding met a Pot Roast and fell madly in love – and the result is pure magic. Forget those complicated casseroles or bland stir-fries; this is the beef and rice recipe that will become your go-to.
What is this cozy beef and rice dish?
So, what exactly is this beloved beef and Rice Recipe? Think of it as a wonderfully flavorful, one-pot wonder that combines tender, savory beef with perfectly cooked rice, all melded together with delicious aromatics and a rich, comforting broth. It’s not quite a pilaf, and it’s not quite a stew, but it has the best elements of both. The rice absorbs all the incredible juices from the beef and the seasonings, making every grain a burst of flavor. It’s essentially a rustic, down-to-earth meal that proves you don’t need a lot of fuss to create something truly memorable. The beauty of this beef and rice recipe is its simplicity – it relies on good quality, basic ingredients that come together to create something far greater than the sum of their parts. It’s the kind of dish that makes your kitchen smell amazing and your taste buds sing. We call it our “comfort bowl” because that’s exactly what it is!
Why you’ll love this recipe?
There are so many reasons why I keep coming back to this beef and rice recipe, and I just know you’re going to fall in love with it too. First off, the flavor is just out of this world. We’re talking deeply savory, with hints of garlic and onion that create this incredible aromatic base. The beef becomes so tender it practically melts in your mouth, and the rice? Oh, the rice! It’s perfectly cooked, fluffy, and infused with all those delicious beefy juices. It’s the ultimate comfort food flavor profile. Then there’s the simplicity. Seriously, you can whip this up on a weeknight without breaking a sweat. Most of the magic happens while it simmers away, letting you do other things. This is a lifesaver for busy evenings! And let’s talk about the cost. This beef and rice recipe is incredibly budget-friendly. It uses common pantry staples and cuts of beef that are affordable and flavorful when cooked low and slow. You get a restaurant-quality meal without the restaurant price tag. Plus, it’s so versatile! While it’s fantastic on its own, you can easily add in some extra veggies like peas or carrots towards the end if you want to bulk it up even more. What I love most about this recipe, though, is the sheer joy it brings. It’s the kind of meal that makes everyone at the table happy, and there’s something so satisfying about that. It’s a guaranteed crowd-pleaser, and honestly, it just makes me feel good to make something so delicious and wholesome for the people I love. It truly stands out from other beef and rice dishes because of that perfect balance of deep flavor and effortless preparation.
How do I make this comforting Beef and Rice dish?
Quick Overview
Making this amazing beef and rice recipe is surprisingly straightforward! You’ll start by searing the beef to lock in all those delicious juices, then sautéing your aromatics. Everything then simmers together in One Pot – the beef, the rice, and a flavorful broth – until the beef is fall-apart tender and the rice is perfectly cooked. It’s a beautiful, hands-off process that results in a deeply satisfying meal. The key is allowing everything to meld together, creating layers of flavor without any complicated steps. This is truly a dump-and-simmer kind of magic, perfect for when you need a hearty meal without all the fuss.
Ingredients
For the Beef and Base:
1.5 lbs beef chuck, cut into 1-inch cubes (Chuck roast is my absolute favorite here because it becomes so tender and flavorful when cooked slowly. You can also use stew meat!)
2 tablespoons olive oil (Or any neutral cooking oil you have on hand)
1 large onion, finely chopped (Yellow or sweet onions work best for that gentle sweetness)
3 cloves garlic, minced (Don’t be shy with the garlic – it’s essential for flavor!)
1 teaspoon dried thyme (Or 1 tablespoon fresh thyme leaves if you have them)
1 teaspoon dried rosemary (Crush it between your fingers before adding for more flavor)
Salt and freshly ground Black Pepper, to taste (Season generously, it makes a big difference!)
2 cups beef broth (Low-sodium is great so you can control the saltiness)
1 cup water
For the Rice:
1.5 cups long-grain white rice (Basmati or jasmine rice are wonderful choices for their aroma and texture. Just make sure it’s uncooked!)
3 cups additional beef broth (Or water, but broth adds so much more depth!)
1/2 teaspoon salt
Optional Garnish:
Fresh parsley, chopped (For a pop of color and freshness)
Step-by-Step Instructions
Step 1: Sear the Beef
Heat the olive oil in a large, heavy-bottomed pot or Dutch oven over medium-high heat. Pat the beef cubes dry with paper towels – this is crucial for getting a good sear! Season the beef generously with salt and pepper. Working in batches if necessary to avoid crowding the pot, add the beef and sear on all sides until nicely browned. Don’t worry about cooking it through, just get that beautiful golden crust. Once seared, remove the beef from the pot and set it aside on a plate.
Step 2: Sauté Aromatics
Reduce the heat to medium. Add the chopped onion to the pot (add a little more oil if needed). Cook, stirring occasionally, until the onion is softened and translucent, about 5-7 minutes. Then, add the minced garlic, dried thyme, and dried rosemary. Cook for another minute until fragrant, stirring constantly so the garlic doesn’t burn. The smell at this stage is already amazing!
Step 3: Deglaze and Add Liquids
Pour in 1 cup of the beef broth and scrape up any browned bits stuck to the bottom of the pot – that’s where a lot of the flavor is! Let it simmer for a minute. Return the seared beef (and any accumulated juices from the plate) to the pot. Add the remaining 1 cup of beef broth and the 1 cup of water. Stir everything together. Bring the mixture to a simmer, then reduce the heat to low, cover the pot tightly, and let it cook for at least 1.5 hours, or until the beef is very tender. I usually aim for around 2 hours to ensure it’s melt-in-your-mouth tender.
Step 4: Prepare and Add Rice
After the beef has been simmering for about 1.5 hours, it’s time to add the rice. Rinse the rice under cold water until the water runs clear. This helps remove excess starch, preventing the rice from becoming mushy. Stir the rinsed rice, the 3 cups of additional beef broth (or water), and 1/2 teaspoon of salt into the pot with the beef and its liquid. Make sure the rice is submerged.
Step 5: Simmer to Perfection
Bring the mixture back to a gentle simmer. Once simmering, cover the pot tightly again and reduce the heat to the lowest setting possible. Let it cook, undisturbed, for about 18-20 minutes, or until the rice is tender and all the liquid has been absorbed. Resist the urge to lift the lid too early!
Step 6: Rest and Fluff
Once the rice is cooked, remove the pot from the heat and let it sit, still covered, for another 5-10 minutes. This resting period is super important for allowing the steam to finish cooking the rice evenly and making it fluffy. After resting, gently fluff the rice and beef mixture with a fork. The beef should be incredibly tender and easily shreddable.
Step 7: Serve
Spoon the beef and rice generously into bowls. Garnish with fresh chopped parsley if desired. Serve hot and enjoy the incredible aroma and flavor!
What to Serve It With
This beef and rice recipe is such a complete meal on its own, but if you’re looking to round out your meal or serve it for a special occasion, there are tons of fantastic pairings. For a cozy breakfast, though a bit unconventional, a small scoop of this savory beef and rice can be surprisingly satisfying alongside a perfectly fried egg. It’s hearty and delicious! For a more traditional brunch setting, I love to serve this with a fresh, crisp green salad tossed with a light vinaigrette. The brightness of the salad cuts through the richness of the beef and rice beautifully. A side of crusty bread for soaking up any extra juices is also a must! If you’re serving this as a main course for dinner, especially on a chilly evening, a simple side of steamed green beans or roasted broccoli is perfection. Their subtle flavors don’t compete with the star of the show. My kids also love it with a side of my easy homemade applesauce – the sweet and savory combination is surprisingly good!
Top Tips for Perfecting Your Beef and Rice
I’ve made this beef and rice recipe more times than I can count, and over the years, I’ve picked up a few little tricks that really elevate it from good to absolutely phenomenal. First, when it comes to the beef, don’t skip the searing step! That browning process creates those little bits of deliciousness stuck to the bottom of the pan, called fond, and it’s where so much of the deep flavor comes from. Make sure your pot is hot enough before you add the beef, and don’t overcrowd the pan, or you’ll end up steaming the meat instead of searing it. Patting the beef dry is also super important for that golden crust. For the onions and garlic, take your time sautéing them until they’re nice and soft; this releases their natural sweetness and creates a fantastic flavor base. If you find your onions are browning too quickly, just lower the heat a bit. When it comes to the rice, rinsing it is key to preventing a gummy texture. I’ve tried it without rinsing once, and while edible, it just wasn’t the same fluffy perfection. Make sure to use the correct amount of liquid for the rice; too much and it’ll be mushy, too little and it’ll be undercooked. Trust me on this one, the resting period after cooking the rice is non-negotiable! It allows the moisture to redistribute evenly, ensuring every grain is perfectly tender. If you want to add vegetables, like peas or carrots, I recommend stirring them in during the last 10-15 minutes of the rice cooking time. They’ll cook through beautifully without getting mushy. For an extra layer of richness, I sometimes stir in a tablespoon of tomato paste with the onions and garlic – it adds a wonderful depth. If you’re making this ahead of time, the flavors often meld even more, making it even tastier the next day! Just be sure to reheat it gently on the stovetop or in the oven to maintain the texture.
Storing and Reheating Tips
This beef and rice recipe is a fantastic make-ahead meal, and honestly, it often tastes even better the next day as all those wonderful flavors have more time to meld together. For storing, make sure the dish has cooled down completely before you transfer it to an airtight container. If you plan to eat it within 3-4 days, you can store it in the refrigerator. Just make sure it’s covered well to prevent it from drying out. When you’re ready to reheat, the stovetop is my preferred method for this dish. Gently warm it in a pot or Dutch oven over low heat, adding a splash of extra beef broth or water if it seems a bit dry. Stir it occasionally to ensure it heats evenly. You can also reheat it in the microwave, but be sure to stir it halfway through to avoid hot spots and ensure consistent warmth. If you need to freeze portions for longer storage, cool the beef and rice completely, then portion it into freezer-safe containers or heavy-duty freezer bags. It should keep well in the freezer for up to 2-3 months. To thaw, transfer it to the refrigerator overnight and then reheat as described above. I’ve also successfully reheated it directly from frozen in the oven at a low temperature (around 300°F or 150°C), covered, for about 30-40 minutes, stirring halfway through. If you’ve made extra glaze or sauce for serving, store it separately and add it just before serving after reheating to keep its freshness.
Frequently Asked Questions
Final Thoughts
I truly hope you give this beef and rice recipe a try. It’s one of those recipes that has earned a permanent spot in my recipe rotation because it’s just so reliable, so delicious, and so comforting. It’s the perfect example of how simple ingredients, prepared with a little love and patience, can create something truly spectacular. The way the tender beef and fluffy rice come together is just pure magic, and the aroma that fills your kitchen while it’s cooking is an experience in itself. It’s the kind of meal that brings people together and leaves everyone feeling happy and satisfied. If you love this recipe, you might also enjoy my Slow Cooker Pot Roast or my One-Pan Lemon Herb Roasted Chicken and Veggies – they have that same comforting, easy-to-make vibe. I can’t wait to hear how yours turns out! Please feel free to leave a comment below and let me know your thoughts, or share any variations you tried. Happy cooking!

Beef and Rice Recipe
Ingredients
Main Ingredients
- 1 pound ground beef
- 1 cup uncooked white rice
- 2 cups beef broth
- 0.5 cup chopped onion
- 2 cloves garlic, minced
- 1 tablespoon olive oil
- 0.5 teaspoon salt
- 0.25 teaspoon black pepper
Instructions
Preparation Steps
- Heat olive oil in a large skillet over medium heat. Add the ground beef and cook until browned, breaking it up with a spoon. Drain off any excess grease.
- Add the chopped onion and minced garlic to the skillet and cook until softened, about 5 minutes.
- Stir in the uncooked rice, beef broth, salt, and pepper. Bring to a boil.
- Reduce heat to low, cover, and simmer for 15-20 minutes, or until the rice is cooked and the liquid is absorbed.
- Let stand covered for 5 minutes before serving.