Oh, you know those nights? The ones where the doorbell rings unexpectedly, or you suddenly remember you promised to bring *something* delicious to that potluck? Yeah, me too. And for years, I’d scramble, trying to whip up something that looked impressive but was secretly a breeze. Then, one lazy Sunday afternoon, experimenting with a few things I had in the fridge, this absolute gem of an antipasto cheese log was born. It’s not just a cheese ball; it’s an experience. It’s the kind of thing that gets rave reviews without anyone knowing you probably assembled it in under 15 minutes while also trying to wrangle kids or find matching socks. If you’ve ever loved a classic cheese ball but wished it had a little more… well, *oomph*, then get ready, because this is it. It’s bright, it’s savory, it’s got a delightful tang, and it’s ridiculously easy. Forget those complicated charcuterie boards that take hours; this antipasto cheese log is your new best friend for effortless entertaining.
What is an antipasto cheese log?
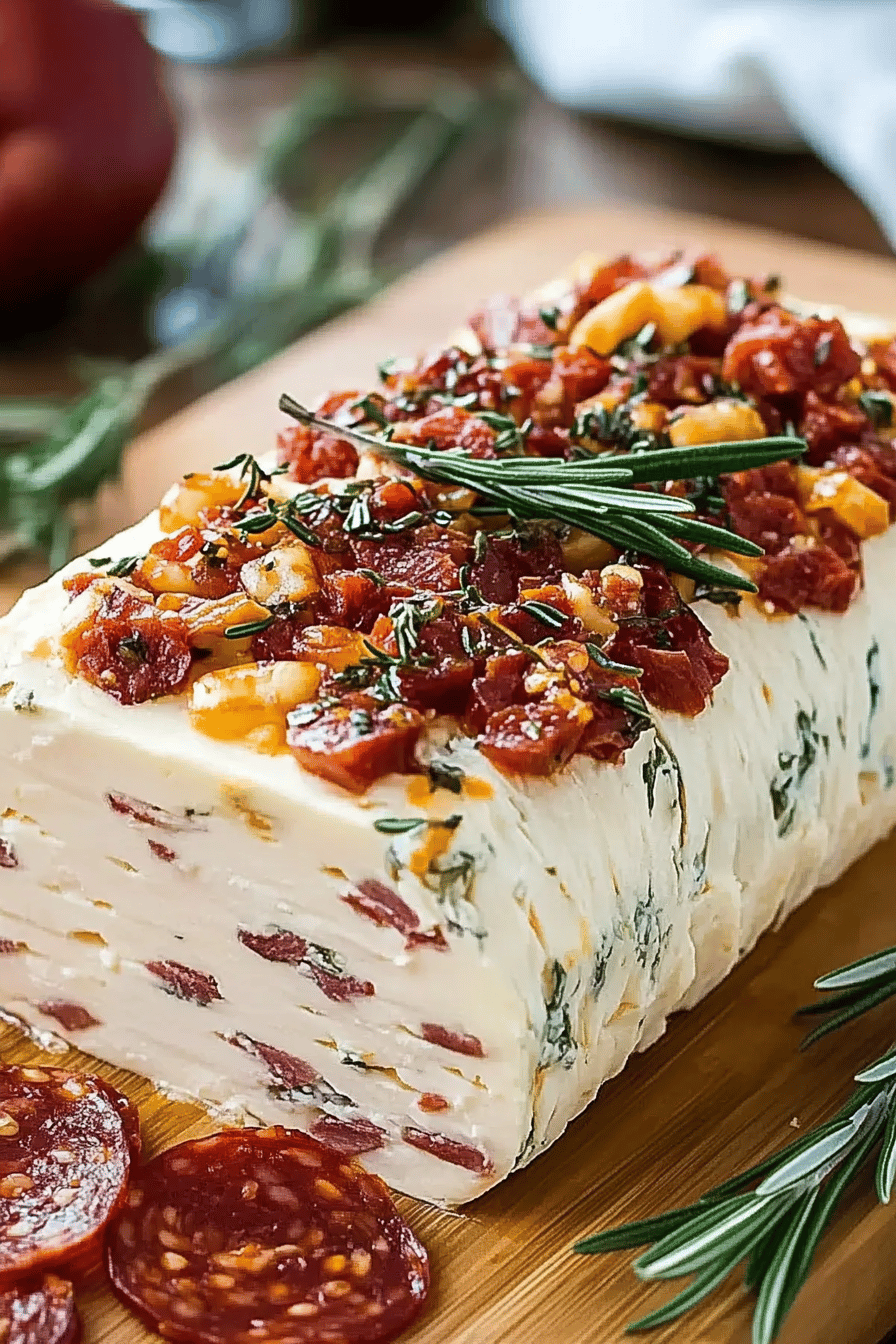
So, what exactly *is* this magical antipasto cheese log? Think of it as the ultimate party dip, but in a beautiful, scoopable, spreadable log shape. It takes all the incredible flavors you find on a fancy antipasto platter – the salty olives, the briny capers, the sun-dried tomatoes, the hint of garlic, maybe a touch of pepperoncini for a little kick – and folds them all together into a creamy, dreamy cheese base. It’s not just CREAM CHEESE, though that’s a big part of its charm; it’s balanced with a couple of other cheeses for depth and texture. The name itself, “antipasto,” means “before the meal” in Italian, and that’s exactly what this is – a tantalizing start to any gathering. It’s essentially a deconstructed antipasto, all wrapped up into one irresistible package that’s begging to be slathered on crackers. It’s the kind of appetizer that makes people go, “Wow, you made this?!” and you can just smile knowingly.
Why you’ll love this recipe?
Honestly, where do I even begin with why this antipasto cheese log is a lifesaver and a total crowd-pleaser? First and foremost, the flavor. It’s like a party in your mouth! You get that creamy, tangy foundation from the cheeses, then bursts of salty goodness from the finely chopped olives and capers. The sun-dried tomatoes add a chewy, sweet-tart element, and if you like a little zing, a finely minced pepperoncini or a pinch of red pepper flakes brings just the right amount of heat. It’s incredibly satisfying without being heavy, and it hits all those savory notes that just make you want more.
Then there’s the simplicity. I’ve made this countless times, and I swear, the most time-consuming part is chopping the little bits for the mix-ins, and even that goes fast if you use a food processor. You literally just mix everything together, shape it, and chill. That’s it! No baking, no complicated techniques, nothing that requires you to be a gourmet chef. This is the recipe you pull out when you’re short on time but want to impress.
And let’s talk budget. Most of the ingredients are pantry staples or things you can pick up easily at any grocery store. Compared to assembling a full charcuterie board with all the fancy meats and cheeses, this is a fraction of the cost, but it delivers just as much wow-factor.
The versatility is another huge win. You can serve this log as-is, or you can roll it in different coatings for extra flavor and texture – toasted nuts, fresh herbs, paprika, you name it! It’s also fantastic for holidays; I’ve made it for Christmas with a sprinkle of rosemary and parsley, and for summer barbecues with a hint of smoked paprika. It’s the kind of dish that makes people ask for the recipe, and when you tell them how easy it was, they’re even more impressed! What I love most is that it feels sophisticated and special, but it’s genuinely one of the easiest appetizers I know.
How do you make an antipasto cheese log?
Quick Overview
This antipasto cheese log is all about bringing together delicious, classic antipasto flavors into a creamy, no-bake appetizer. You’ll simply combine softened cream cheese and a couple of other complementary cheeses with a medley of finely chopped antipasto ingredients. Then, you’ll shape it into a log, chill it until firm, and perhaps add an optional coating for an extra pop of flavor and visual appeal. It’s the perfect make-ahead dish that’s ready when you are, requiring minimal effort for maximum flavor impact. Seriously, it’s almost ridiculously easy!
Ingredients
For the main cheese base:
2 blocks (8 oz each) cream cheese, softened – Make sure these are really softened! I usually leave them on the counter for at least an hour, sometimes two, especially if my kitchen is cool. It makes them so much easier to mix and prevents lumps. Full-fat is best for creaminess, but light works in a pinch.
4 oz sharp cheddar cheese, finely shredded – This adds a nice bite and depth that cream cheese alone can’t give. I like sharp cheddar because it has more flavor. You could also use a good Gruyere or even a mild provolone if you prefer!
2 oz Parmesan cheese, finely grated – Just a little bit of Parmesan adds that salty, nutty umami that ties everything together. Plus, it melts beautifully into the cream cheese.
For the Antipasto Mix-ins:
1/4 cup pitted Kalamata olives, very finely chopped – Kalamatas have such a wonderful fruity, briny flavor. You want them *really* finely chopped, almost minced, so they distribute evenly and you get a little taste in every bite. If you don’t have Kalamatas, good quality black olives will work, but Kalamatas are my favorite here.
2 tablespoons capers, drained and very finely chopped – Capers add that essential salty, briny punch. Again, chop them finely. Make sure to drain them well, though, so you don’t make the cheese mixture too wet.
2 tablespoons sun-dried tomatoes (oil-packed), drained and very finely chopped – These bring a delightful chewiness and a concentrated sweet-tart flavor. Draining them well is key. If they’re very oily, you might even want to pat them dry with a paper towel.
1 tablespoon fresh parsley, finely chopped – For a pop of fresh green color and a subtle herby note.
1/2 teaspoon garlic powder – Or you could use a tiny clove of fresh garlic, minced super fine, but garlic powder is easier to distribute evenly and gives a consistent flavor.
1/4 teaspoon Black Pepper – Freshly ground is always best if you have it!
Optional Coatings (for rolling the log):
1/4 cup chopped toasted pecans or walnuts – Adds a wonderful crunch and nutty flavor.
2 tablespoons chopped fresh chives or parsley – For a fresh, herbaceous finish.
1 tablespoon paprika (sweet or smoked) – For color and a subtle smoky or sweet flavor.
Step-by-Step Instructions
Step 1: Preheat & Prep Pan
This step is more about setting yourself up for success than actual cooking! Grab a medium-sized mixing bowl and make sure you have a sheet of plastic wrap or parchment paper ready to go for shaping the log later. Since this is a no-Bake Recipe, there’s no oven preheating needed, which is one of the many reasons I adore it.
Step 2: Mix Dry Ingredients
In your mixing bowl, combine the softened cream cheese, shredded cheddar cheese, and grated Parmesan cheese. Use a sturdy spoon or a spatula to mash and blend them together until they are as smooth as possible. It’s important that the cream cheese is truly softened for this; if it’s still firm, you’ll end up with lumps, and nobody wants a lumpy cheese log!
Step 3: Mix Wet Ingredients
This step is actually combined with the “dry” ingredients in this case! So, into the cheese mixture, add the finely chopped Kalamata olives, capers, sun-dried tomatoes, fresh parsley, garlic powder, and black pepper. Stir everything together really well with your spoon or spatula.
Step 4: Combine
Continue to mix the ingredients until everything is thoroughly combined and evenly distributed. You want to make sure those little bits of olives, capers, and tomatoes are spread throughout the cheese base. Take your time here; scraping down the sides of the bowl a few times ensures that every bite is packed with flavor. The mixture should look like a beautiful, mosaic-studded cheese blend.
Step 5: Prepare Filling
At this stage, your “filling” is actually the cheese mixture you just made! So, once everything is well combined, you’re essentially ready to shape it. If you decided to toast any nuts for an optional coating, now would be the time to do that in a dry skillet over medium heat for a few minutes until fragrant, then let them cool completely.
Step 6: Layer & Swirl
Lay out a large piece of plastic wrap or parchment paper on your clean counter. Spoon the cheese mixture onto the center of the plastic wrap. Use your hands (you might want to lightly dampen them or wear gloves if you’re not coating the log) to shape the mixture into a rustic log, about 6-7 inches long and 2-3 inches in diameter. If you’re adding a coating, now is the time to prepare your chosen coating on a plate.
Step 7: Bake
No baking required for this one! That’s the beauty of it. The chilling process is what firms everything up and allows the flavors to meld beautifully.
Step 8: Cool & Glaze
Once your log is shaped, tightly wrap it in the plastic wrap or parchment paper. You can then gently roll it in your chosen coating (pecans, chives, paprika, etc.) right now if you’re adding one. Place the wrapped log in the refrigerator for at least 2 hours, or until it’s firm enough to hold its shape. The longer it chills, the better the flavors will meld. If you’re adding a coating, you can roll it in it *after* it’s firm and then wrap it up again, or roll it before chilling as I often do.
Step 9: Slice & Serve
When you’re ready to serve, unwrap the antipasto cheese log. Slice it into rounds using a sharp knife. Serve it with an assortment of crackers, crusty bread, or even fresh vegetable sticks. It’s best served slightly chilled but not straight from the deepest part of the fridge; letting it sit out for about 10-15 minutes makes it softer and more spreadable.
What to Serve It With
This antipasto cheese log is incredibly versatile, making it perfect for almost any occasion. For a lovely breakfast or brunch, I love serving it alongside some crusty baguette slices, maybe with a side of fresh fruit like melon or berries. It adds a savory counterpoint to sweet pastries. The bright flavors just wake up your palate!
As a more formal dessert offering, though it leans savory, it can be surprisingly delightful. Picture this: a small portion of the cheese log, perhaps rolled in toasted almonds or pistachios, served on a small slate board with a drizzle of honey and some thinly sliced pear or apple. It’s unexpected and sophisticated.
For casual get-togethers, it’s the ultimate snack food. I always have it on hand for impromptu get-togethers or when the kids’ friends descend. We just grab a bunch of different crackers – water crackers, rye crisps, pita chips – and dig in. My kids also love it spread on little toasted crostini.
My personal family tradition? We always have this for New Year’s Eve. It’s easy to make ahead, and it’s always a hit as people mingle before the big countdown. I’ll often roll it in a mix of chopped chives and a little bit of chili flakes for a festive look and a subtle kick. It’s that reliable, delicious dish that just makes everyone happy and makes the gathering feel a little more special, without adding any stress to my plate.
Top Tips for Perfecting Your Antipasto Cheese Log
I’ve made this antipasto cheese log more times than I can count, and over the years, I’ve picked up a few tricks that really make a difference. First, the quality of your olives and capers matters. If you use the really cheap, watery ones, the flavor just isn’t as good. I love Kalamata olives for their rich, fruity flavor, and good quality capers add that perfect briny pop. Make sure they are *really* finely chopped, though – I usually mince them with a chef’s knife until they’re almost paste-like. This ensures they integrate beautifully into the cheese and you don’t get huge chunks.
When it comes to mixing, the key is patience and ensuring your cream cheese is truly softened. If it’s not soft enough, you’ll struggle to get a smooth base, and you might end up overworking the mixture trying to break up the lumps. I’ve learned that letting it sit out on the counter for a good hour or two, or even gently softening it in the microwave for a few seconds (carefully!), makes all the difference. Don’t skip grating your own cheddar and Parmesan; the pre-shredded stuff often has anti-caking agents that can affect the texture.
For shaping, I always recommend using plastic wrap. It helps create a nice, tight log and makes it easier to transfer. If you’re adding a coating, you can either roll the log in it *before* chilling, which helps it stick better, or chill the log first until it’s firm, then unwrap it and roll it in the coating, re-wrapping it to set. I find rolling it before chilling gives a more even coating, but doing it after means the coating stays fresher if you have leftovers.
My biggest “aha!” moment with this recipe was realizing how much flavor you can add with subtle additions. While the olives and capers are key, a tiny pinch of red pepper flakes or a finely minced piece of pepperoncini can add a wonderful subtle heat that cuts through the richness of the cheese. Don’t go overboard, just a little something to make it more interesting.
For baking? Oh wait, there’s no baking! That’s the best part! But for chilling, make sure you give it enough time. A quick 30 minutes just won’t cut it. You need at least two hours for it to firm up properly so it slices cleanly. If you’re in a real rush, you can pop it in the freezer for about 30-45 minutes, but keep a close eye on it!
Finally, if you want to experiment with glaze variations (though this recipe doesn’t call for one, it’s good to know for other cheese balls!), you can try a drizzle of fig jam or a balsamic glaze over the top just before serving for an extra touch of sweetness and elegance.
Storing and Reheating Tips
This antipasto cheese log is a dream for make-ahead entertaining because it stores so well. If you’ve made it and plan to serve it within a day or two, keeping it at room temperature for about 15-20 minutes before serving is ideal for spreadability. For storage, it’s best to keep it tightly wrapped in plastic wrap or in an airtight container. At room temperature, it’s best to serve it within about 2-3 hours, especially if your house is warm, just to be safe.
When it comes to refrigerator storage, this is where it really shines. Once firm, keep it well-wrapped in plastic wrap, or pop it into a sturdy airtight container. It will keep beautifully in the fridge for up to 5-7 days. The flavors actually tend to meld and deepen over time, making it even tastier! Just remember to let it sit out for a bit to soften before serving again.
Freezing is also an option, though I tend to prefer it fresh or refrigerated. If you do want to freeze it, wrap it very tightly in a double layer of plastic wrap, then a layer of aluminum foil, and place it in a freezer-safe bag or container. It should last for about 1-2 months. To thaw, transfer it from the freezer to the refrigerator and let it thaw slowly overnight. Again, it will need time to soften at room temperature before serving.
Regarding glaze timing, if you’re adding a coating like nuts or herbs, it’s generally best to add them just before serving or right before chilling if you plan to eat it within a day or two. If you’re freezing it, I’d recommend adding any delicate coatings (like fresh herbs or nuts) *after* thawing to keep them looking their best.
Frequently Asked Questions
Final Thoughts
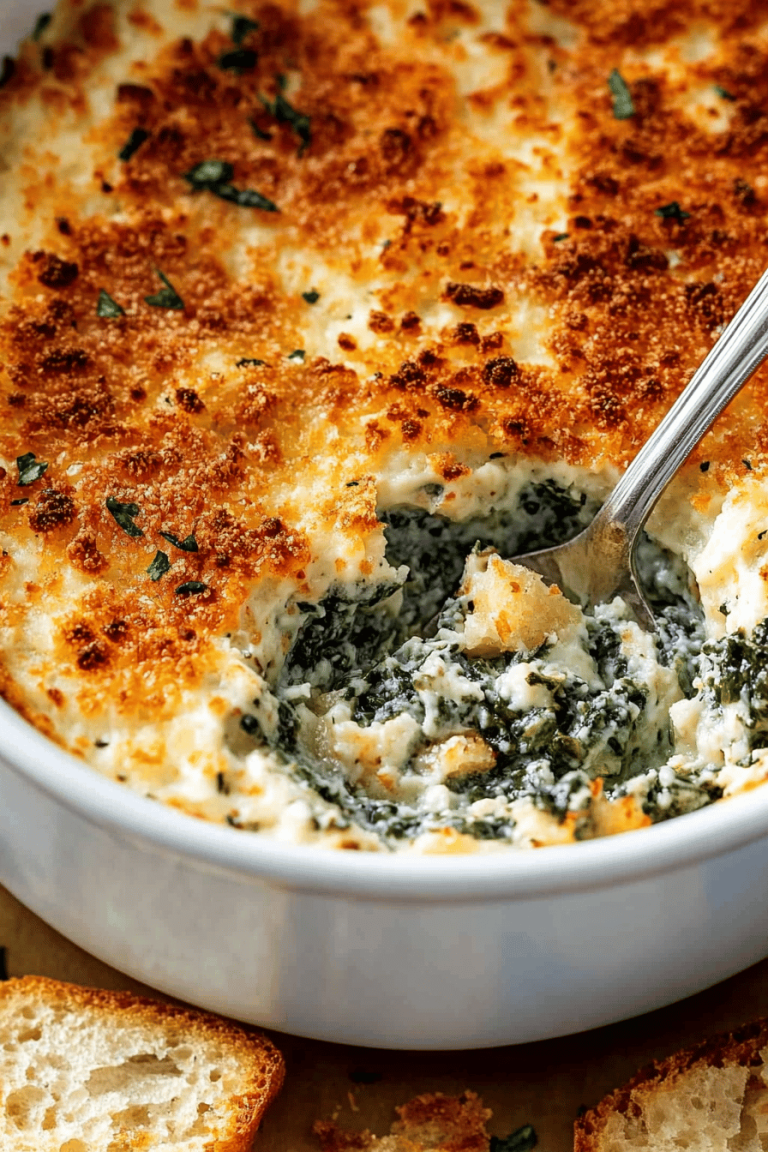
So there you have it – my absolute favorite antipasto cheese log recipe! I really hope you give this one a try. It’s one of those recipes that feels fancy and impressive, but is genuinely so straightforward that it makes entertaining a joy, not a chore. It’s the perfect balance of creamy, savory, and tangy, with all those delicious little pops of antipasto flavor. Whether you’re hosting a big party, having friends over for a casual get-together, or just looking for a fantastic snack to enjoy with your favorite beverage, this cheese log is guaranteed to be a hit. It’s the kind of dish that always disappears first! If you love this recipe, you might also enjoy my creamy Spinach Artichoke Dip or my foolproof Bruschetta Bites. I can’t wait to hear what you think of this antipasto cheese log! Please leave a comment below with your thoughts, any variations you try, or how your guests loved it. Happy spreading!

Antipasto Cheese Log
Ingredients
Main Ingredients
- 8 ounces cream cheese softened
- 4 ounces shredded cheddar cheese
- 4 ounces shredded Parmesan cheese
- 0.5 cup finely chopped pepperoni
- 0.25 cup finely chopped Kalamata olives
- 2 tablespoons chopped fresh parsley
- 1 teaspoon garlic powder
- 0.5 teaspoon onion powder
- 0.25 teaspoon black pepper
For Rolling
- 0.5 cup chopped toasted almonds
- 0.25 cup shredded Parmesan cheese
- 2 tablespoons chopped fresh parsley
Instructions
Preparation Steps
- In a large bowl, combine the softened cream cheese, shredded cheddar cheese, shredded Parmesan cheese, chopped pepperoni, chopped Kalamata olives, chopped fresh parsley, garlic powder, onion powder, and black pepper. Mix well until all ingredients are evenly incorporated.
- Lay out a large piece of plastic wrap on a clean surface. Spoon the cheese mixture onto the plastic wrap and shape it into a log.
- In a small bowl, combine the chopped toasted almonds, shredded Parmesan cheese, and chopped fresh parsley. Mix to combine.
- Roll the cheese log in the almond mixture, pressing gently to ensure it adheres evenly. Wrap the log tightly in the plastic wrap.
- Refrigerate for at least 1 hour, or until firm, before serving.
- Serve the Antipasto Cheese Log with crackers, baguette slices, or crudités.