Oh, where do I even begin with this Crispy Honey Chicken? It’s one of those recipes that feels like a warm hug on a plate, and honestly, it’s become a staple in our house. I remember the first time I made it, a few years back when my kids were little and picky beyond belief. I was looking for something sweet, a little sticky, and with that satisfying crunch that always gets a thumbs-up. Forget fancy restaurant versions; this is the real deal, homemade goodness that’s surprisingly simple to whip up. It’s got that irresistible sweet and savory balance that just hits all the right notes. If you’ve ever loved General Tso’s or sweet and sour chicken, you’re going to be absolutely obsessed with this. It’s the kind of dish that makes everyone clear their plates and ask for seconds – no joke!
What is Crispy Honey Chicken?
So, what exactly is this magical dish we call Crispy Honey Chicken? Think of it as your ultimate comfort food, but with a delightful twist. It’s essentially pieces of chicken, coated in a light, super-crispy batter, then tossed in a luscious, sticky honey glaze. The “crispy” part is non-negotiable for me; it’s what makes every bite so addictive! The honey glaze isn’t just plain honey, though. It’s a beautiful symphony of sweet, a little tangy, and sometimes a hint of savory, all coming together to coat the chicken in pure deliciousness. It’s the kind of meal that looks and tastes like you spent hours in the kitchen, but in reality, it’s a lifesaver on those busy weeknights when you need something impressive but quick. It’s not complicated, but the result is seriously restaurant-quality.
Why you’ll love this recipe?
Honestly, there are so many reasons why this Crispy Honey Chicken Recipe has earned a permanent spot in my recipe binder. First off, the flavor. It’s this incredible dance between sweet and savory. The chicken itself is juicy and tender inside, but that crunchy coating? Pure perfection. And the glaze! It’s sticky, sweet, with just enough tang to cut through the richness. It’s the kind of flavor that makes you close your eyes and savor every mouthful. Then there’s the simplicity. I know, I know, anything deep-fried might sound intimidating, but I’ve streamlined this process so much over the years. It’s actually quite straightforward, and the results are so worth it. You don’t need a lot of fancy ingredients either; most of what you’ll need is probably already in your pantry. I also love how versatile it is! You can serve it over fluffy white rice, with some steamed broccoli, or even just as a stand-alone appetizer. It’s a crowd-pleaser, from my toddler to my father-in-law. What I love most about this is that it truly satisfies that craving for something a little decadent without being overly complicated or breaking the bank. It’s the perfect balance of ease, incredible taste, and pure comfort.
How do I make crispy chicken?
Quick Overview
This Crispy Honey Chicken is all about achieving that perfect crunch and then coating it in a glorious, sticky glaze. We’ll start by preparing a simple, light batter for the chicken, frying it until golden brown and super crispy, and then tossing it in a luscious honey-based sauce. The key is in the frying technique to get that amazing texture, and then a quick toss in the glaze ensures every piece is coated. It’s a straightforward process that delivers spectacular results, making it ideal for weeknight dinners or special occasions alike.
Ingredients
For the Chicken & Batter: What is the difference between a chicken and a bag?
1.5 lbs boneless, skinless chicken thighs or breasts, cut into bite-sized pieces. Thighs tend to stay juicier, but breasts work great too if you don’t overcook them!
1 cup all-purpose flour. This is our base for the crispy coating.
1/4 cup cornstarch. The secret weapon for extra crispiness. Don’t skip this!
1 teaspoon salt. Essential for bringing out the flavor.
1/2 teaspoon Black Pepper. A little kick never hurt anyone.
1/2 teaspoon garlic powder. Adds a subtle savory depth.
1 large egg, lightly beaten. This helps the batter adhere to the chicken.
1/2 cup milk (any kind works, but I usually use whole milk for richness). This creates the batter consistency.
Vegetable oil, for frying. You’ll need enough to generously coat the bottom of your pan, about 1-2 inches deep.
For the Honey Glaze:
1/2 cup honey. The star of the show! Use a good quality honey for the best flavor.
1/4 cup soy sauce. Adds that essential umami and saltiness.
2 tablespoons rice vinegar. This brings a lovely tang that balances the sweetness.
1 tablespoon brown sugar. For a little extra caramelization and depth.
1 teaspoon grated fresh ginger. Adds a wonderful warmth and zing.
1 clove garlic, minced. Because garlic makes everything better.
1 teaspoon cornstarch mixed with 2 teaspoons water (this is your slurry). This thickens the glaze to that perfect sticky consistency.
Step-by-Step Instructions
Step 1: Preheat & Prep Pan
First things first, let’s get our frying oil ready. Pour your vegetable oil into a heavy-bottomed pot or a deep skillet. You want enough oil so that the chicken pieces can float freely and get evenly crispy. Heat the oil over medium-high heat until it reaches about 350°F (175°C). If you don’t have a thermometer, you can test it by dropping a tiny bit of batter in; it should sizzle immediately and float to the top. While the oil heats up, you can get started on your chicken and batter.
Step 2: Mix Dry Ingredients
In a medium bowl, whisk together the flour, cornstarch, salt, black pepper, and garlic powder. Make sure it’s all well combined. This dry mix is what will give our chicken that fantastic, shatteringly crisp exterior. I always give it a good whisk to ensure there are no lumps of cornstarch hiding!
Step 3: Mix Wet Ingredients
In a separate bowl, whisk the egg and milk together until they’re well combined. This liquid mixture will be added to the dry ingredients to create our batter. Don’t over-whisk it; just a gentle blend is perfect.
Step 4: Combine
Now, pour the wet ingredients into the bowl with the dry ingredients. Stir *just until* combined. It’s really important not to overmix here. A few lumps are totally fine, even preferred! Overmixing develops the gluten in the flour, which can lead to a tougher batter instead of a light and crispy one. The batter should be thick enough to coat the chicken but not so thick that it’s pasty.
Step 5: Prepare Filling
This is where the magic happens for the glaze! In a small saucepan, combine the honey, soy sauce, rice vinegar, brown sugar, grated ginger, and minced garlic. Place this saucepan over medium heat and stir until the sugar dissolves and everything is well combined. Let it simmer gently for about 2 minutes. Then, stir in the cornstarch slurry (cornstarch mixed with water) and whisk continuously until the glaze thickens to a nice, syrupy consistency. Remove from heat and set aside.
Step 6: Layer & Swirl
Take your chicken pieces and dip them into the batter, making sure each piece is fully coated. Let any excess batter drip off for a second before carefully placing them into the hot oil. Don’t overcrowd the pan; fry the chicken in batches. This is crucial for maintaining the oil temperature and ensuring each piece gets perfectly crispy. Fry for about 3-4 minutes per side, or until golden brown and cooked through.
Step 7: Bake
Actually, there’s no baking in this recipe! We’re frying the chicken until it’s beautifully golden and crispy. So, this step is actually about frying! Once the chicken pieces are done and perfectly crispy, remove them from the oil using a slotted spoon and place them on a wire rack set over a baking sheet. This allows excess oil to drain off, keeping them extra crispy. Repeat with the remaining chicken, ensuring you don’t crowd the pan.
Step 8: Cool & Glaze
Once all your chicken is fried and draining, it’s time to bring on the glaze! Gently pour the prepared honey glaze over the crispy chicken. Toss everything together carefully until each piece of chicken is beautifully coated in that glossy, sticky sauce. You want to do this right before serving so the chicken stays as crispy as possible. If you let it sit too long in the glaze, it can get a bit soggy, and nobody wants that!
Step 9: Slice & Serve
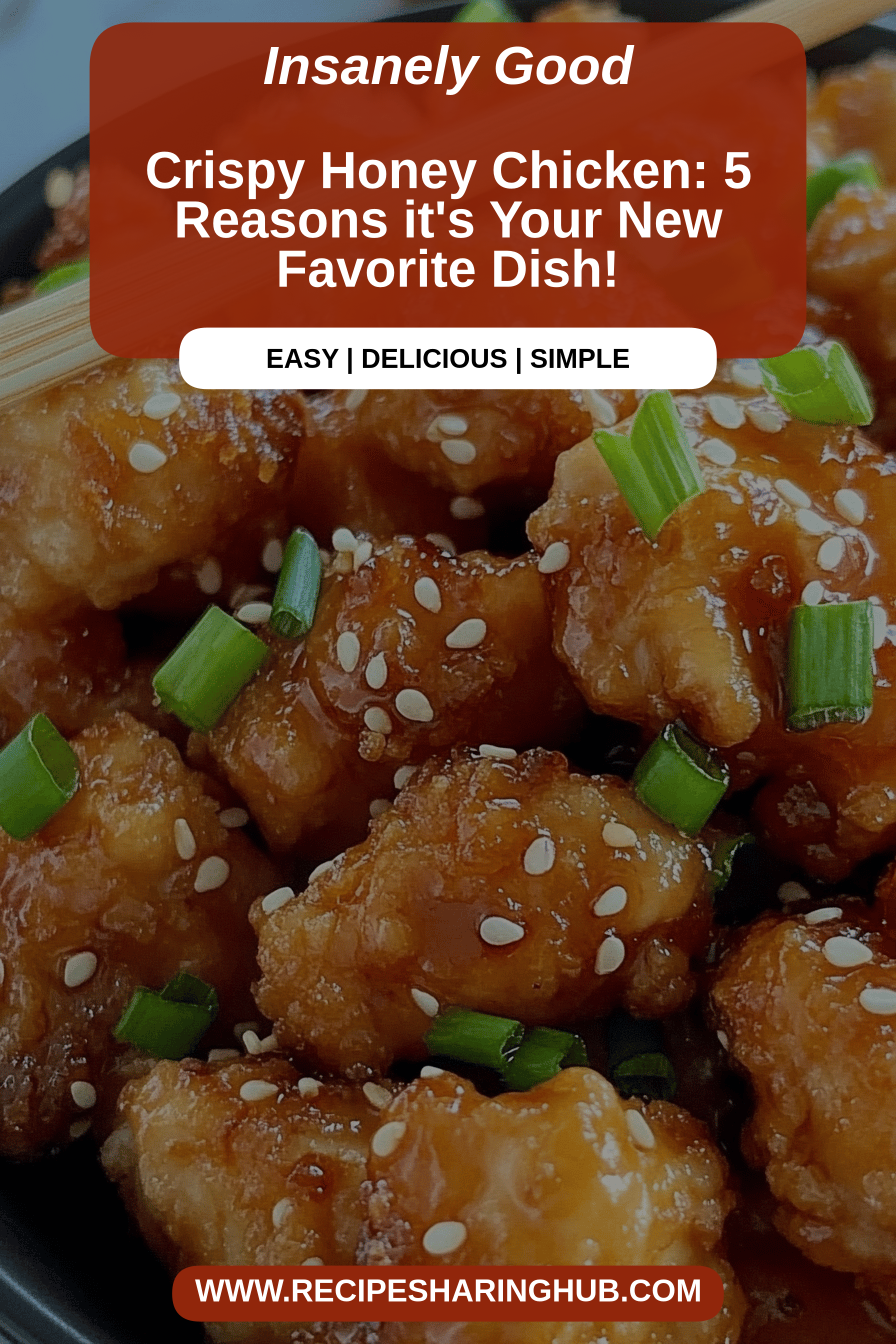
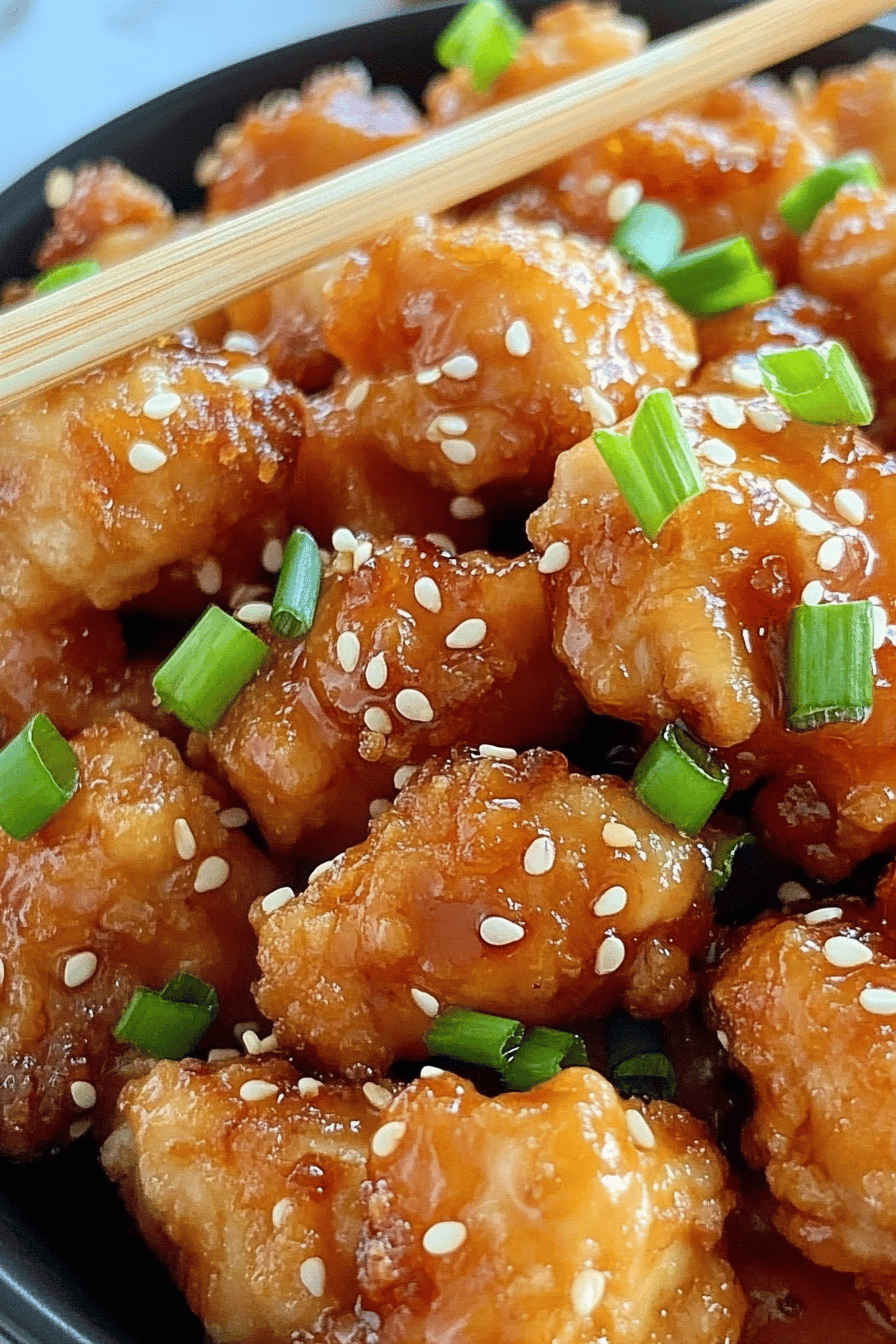
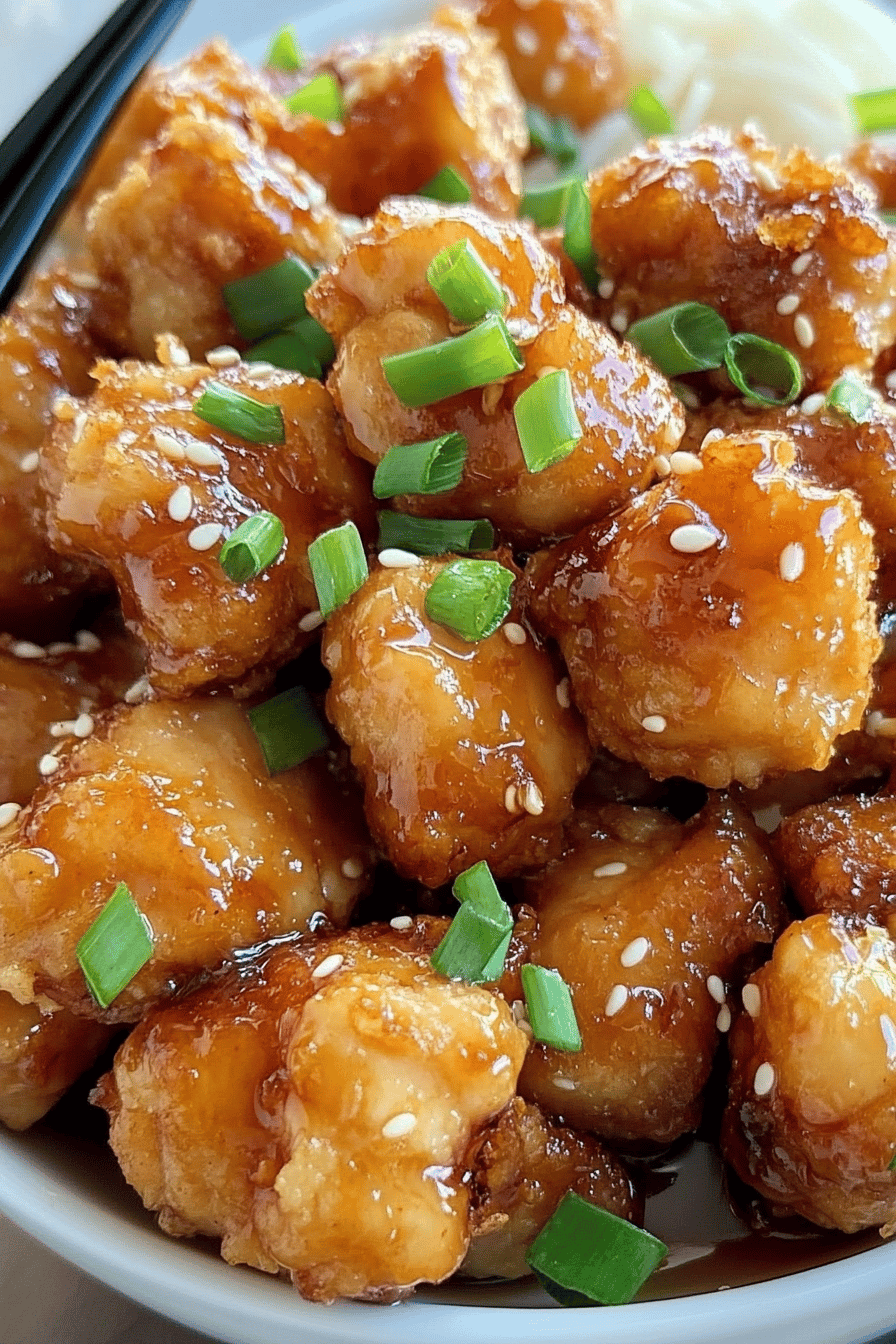
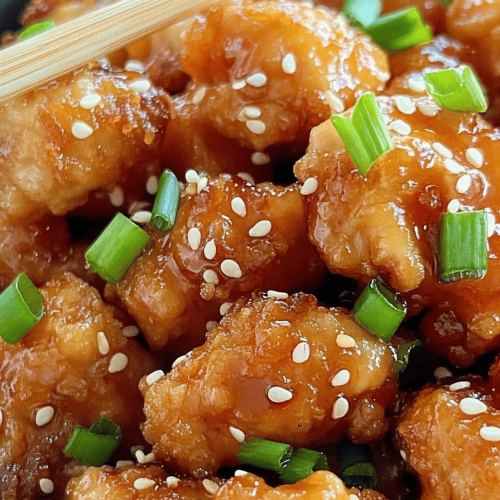
Serve your Crispy Honey Chicken immediately! It’s best enjoyed piping hot so you can experience that amazing crunch with every bite. You can sprinkle some toasted sesame seeds and chopped green onions on top for a pop of color and extra flavor. It’s truly a showstopper!
What to Serve It With
This Crispy Honey Chicken is so versatile, it can honestly fit into almost any meal plan! For a classic dinner, serving it over fluffy jasmine rice is a no-brainer. The rice soaks up any extra glaze, and it’s just pure comfort. Add some steamed or stir-fried broccoli or green beans for a complete meal. If you’re feeling a bit fancier, maybe for a weekend brunch or a light dinner party, I love serving it with a fresh, crisp Asian-inspired slaw. The crunch from the slaw is a perfect contrast to the sticky chicken. For a more casual vibe, maybe for game night or a movie marathon, these make fantastic appetizers! Just put them in a bowl with some toothpicks, and watch them disappear. I’ve even had people ask for the recipe when I’ve served them at potlucks. My kids also love them tucked into soft bao buns or lettuce wraps for a fun, deconstructed meal. It’s all about what you’re craving!
Top Tips for Perfecting Your Crispy Honey Chicken
Okay, so you want that *perfect* Crispy Honey Chicken, right? I’ve made this dish more times than I can count, and I’ve learned a few tricks along the way that I think you’ll really appreciate. First, about the chicken prep: I always opt for chicken thighs because they’re more forgiving and stay incredibly juicy, even with frying. If you use breasts, just be extra mindful not to overcook them, or they can dry out. When you’re mixing the batter, seriously, resist the urge to overmix. A few lumps are your friends here; they create little pockets of crispiness. If the batter is too thick, add a tiny splash more milk. Too thin? A sprinkle more flour. You’re looking for a consistency that coats the chicken well but isn’t heavy. For the frying, make sure your oil is at the right temperature. Too low, and the chicken will absorb too much oil and be greasy. Too high, and the outside will burn before the inside is cooked. Consistency is key, so try to maintain that 350°F (175°C). Frying in batches is non-negotiable; it prevents the oil temperature from dropping too much and ensures each piece gets maximum crispiness. Trust me on this one! For the glaze, taste as you go. My preference is for it to be a little sweet with a good tang, but you might like it sweeter or more savory. Adjust the honey, soy sauce, or vinegar to your liking. And a quick tip: if your glaze seems too thin after adding the cornstarch slurry, just simmer it a little longer. If it’s too thick, a tiny bit of water or broth can help loosen it up. The timing of glazing is also important; toss the chicken in the glaze *just before* serving. This preserves that beautiful crispiness. I’ve learned that the hard way by letting it sit too long and ending up with slightly soggy chicken – a culinary tragedy!
Storing and Reheating Tips
Now, about leftovers. If, by some miracle, you have any Crispy Honey Chicken left over (which rarely happens in my house!), here’s how to keep it tasting its best. At room temperature, I’d say it’s best to consume it within two hours. After that, it’s safer to refrigerate it. For refrigerator storage, place the chicken in an airtight container. It will generally keep well for about 2-3 days. When it comes to reheating, this is where you can really save the day and bring back some of that crunch. The microwave is quick, but it can make the chicken a bit soft. For the best results, I highly recommend reheating it in a preheated oven or an air fryer. Pop it on a baking sheet in a 350°F (175°C) oven for about 5-8 minutes, or in an air fryer at around 375°F (190°C) for 3-5 minutes, until it’s heated through and the coating is re-crisped. If you plan to freeze it, let the chicken cool completely first, then wrap it tightly in plastic wrap and then in foil or place it in a freezer-safe container. It should be good in the freezer for up to 2-3 months. Thaw it in the refrigerator overnight before reheating using the oven or air fryer method. For the glaze, I always recommend tossing the chicken in the glaze *after* reheating, if possible, or just before serving if you’re packing it for lunch. This helps maintain the texture. If you glaze it before storing, it might get a bit softer but will still be delicious!
Frequently Asked Questions
Final Thoughts
So there you have it, my absolute favorite Crispy Honey Chicken recipe! I truly hope you give this one a try. It’s more than just a meal; it’s that feel-good food that brings smiles to the table. The combination of that satisfying crunch, the juicy chicken, and that irresistible sweet and savory glaze is just perfection. It’s one of those recipes that I come back to again and again, especially when I want to impress without a lot of fuss. It’s proof that incredible flavors don’t always require complicated steps. If you enjoy this kind of sweet and savory goodness, you might also love my sticky sesame chicken or my honey garlic shrimp recipes – they’re also big hits in our household! I can’t wait to hear what you think, and if you try this Crispy Honey Chicken, please let me know how it turns out in the comments below! I love seeing your creations and hearing about your own family’s reactions. Happy cooking!
Crispy Honey Chicken
Ingredients
For the Chicken
- 0.5 cup All-purpose flour
- 0.25 cup Cornstarch
- 1 teaspoon Salt
- 0.5 teaspoon Black pepper
- 0.5 teaspoon Garlic powder
- 0.5 teaspoon Paprika
- 1.5 pounds Boneless, skinless chicken thighs cut into bite-sized pieces
- 2 large Eggs beaten
- 0.5 cup Vegetable oil for frying
For the Honey Sauce
- 0.5 cup Honey
- 0.25 cup Soy sauce
- 2 tablespoons Rice vinegar
- 1 tablespoon Sesame oil
- 1 clove Garlic minced
- 0.5 teaspoon Ginger grated
- 1 teaspoon Cornstarch mixed with 1 tablespoon water
Garnish
- 1 tablespoon Sesame seeds
- 1 tablespoon Green onions chopped
Instructions
Preparation Steps
- In a shallow dish, whisk together flour, cornstarch, salt, pepper, garlic powder, and paprika. In another shallow dish, beat the eggs.
- Dredge the chicken pieces first in the beaten eggs, then in the flour mixture, ensuring each piece is fully coated. Shake off any excess.
- Heat vegetable oil in a large skillet or wok over medium-high heat. Fry the chicken in batches until golden brown and cooked through, about 5-7 minutes per batch. Remove chicken from skillet and drain on paper towels.
- While the chicken is frying or draining, prepare the honey sauce. In a small saucepan, combine honey, soy sauce, rice vinegar, sesame oil, minced garlic, and grated ginger. Bring to a simmer over medium heat.
- Whisk in the cornstarch slurry and cook until the sauce thickens, about 1-2 minutes.
- Return the fried chicken to the skillet with the thickened honey sauce. Toss to coat evenly.
- Serve immediately, garnished with sesame seeds and chopped green onions.