Oh, this Chocolate Peppermint Lush… it’s more than just a dessert for me. It’s the taste of cozy evenings, the smell that instantly makes my kitchen feel like home, and honestly, the thing that saves me when unexpected guests pop by and I haven’t had time to bake anything elaborate. You know those nights? The doorbell rings, you panic a little, and then you remember this gem. It’s like a shortcut to impressing everyone without breaking a sweat. It reminds me a bit of those old-school layered puddings my grandma used to make, but with a rich chocolatey depth and that perfect hint of peppermint that just makes it sing. If you’ve ever loved a decadent chocolate cake or a creamy no-bake cheesecake, you’re going to fall head over heels for this Chocolate Peppermint Lush. It’s truly one of those recipes that gets better every time I make it, and trust me, I’ve made it a *lot*.
What is chocolate peppermint lush?
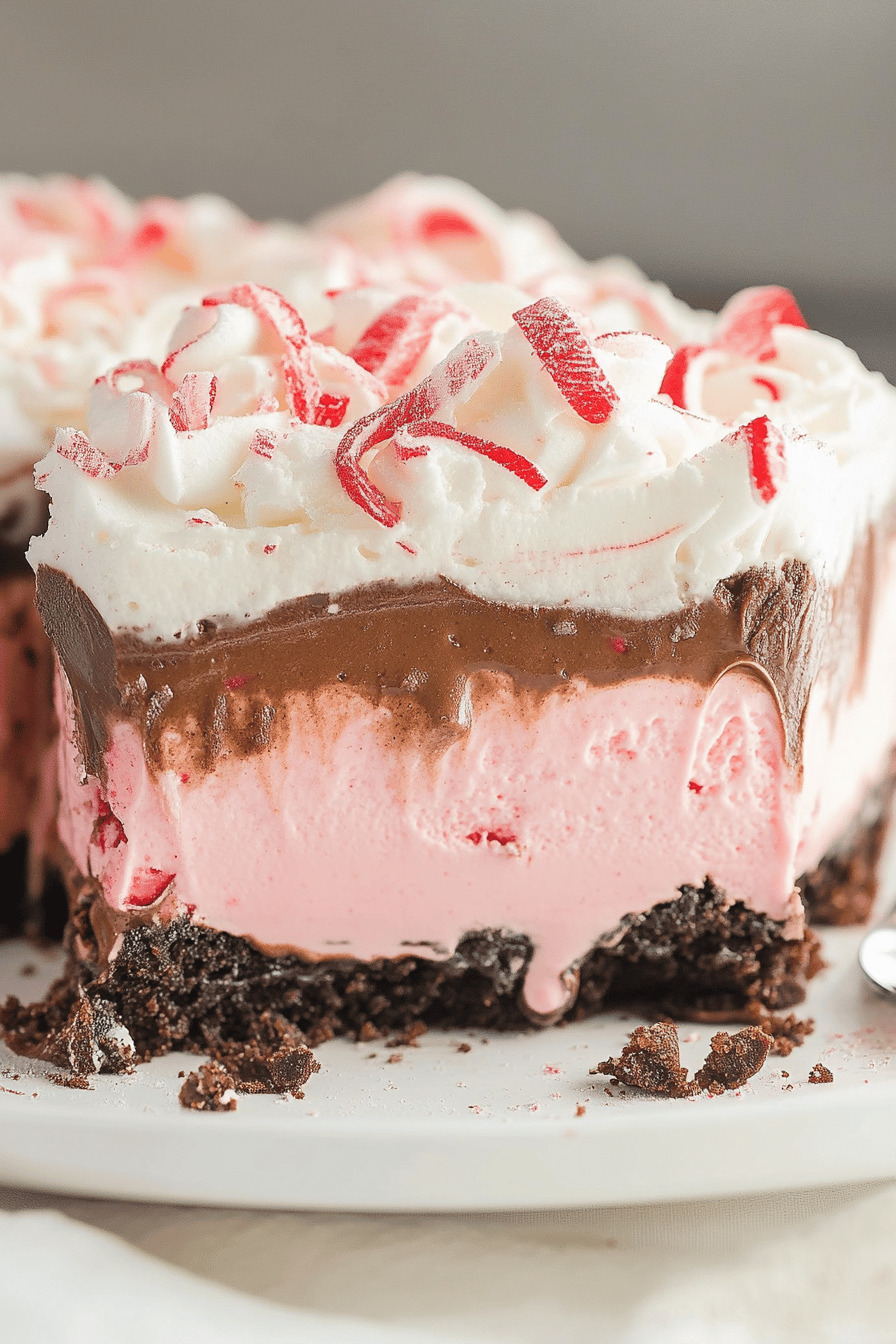
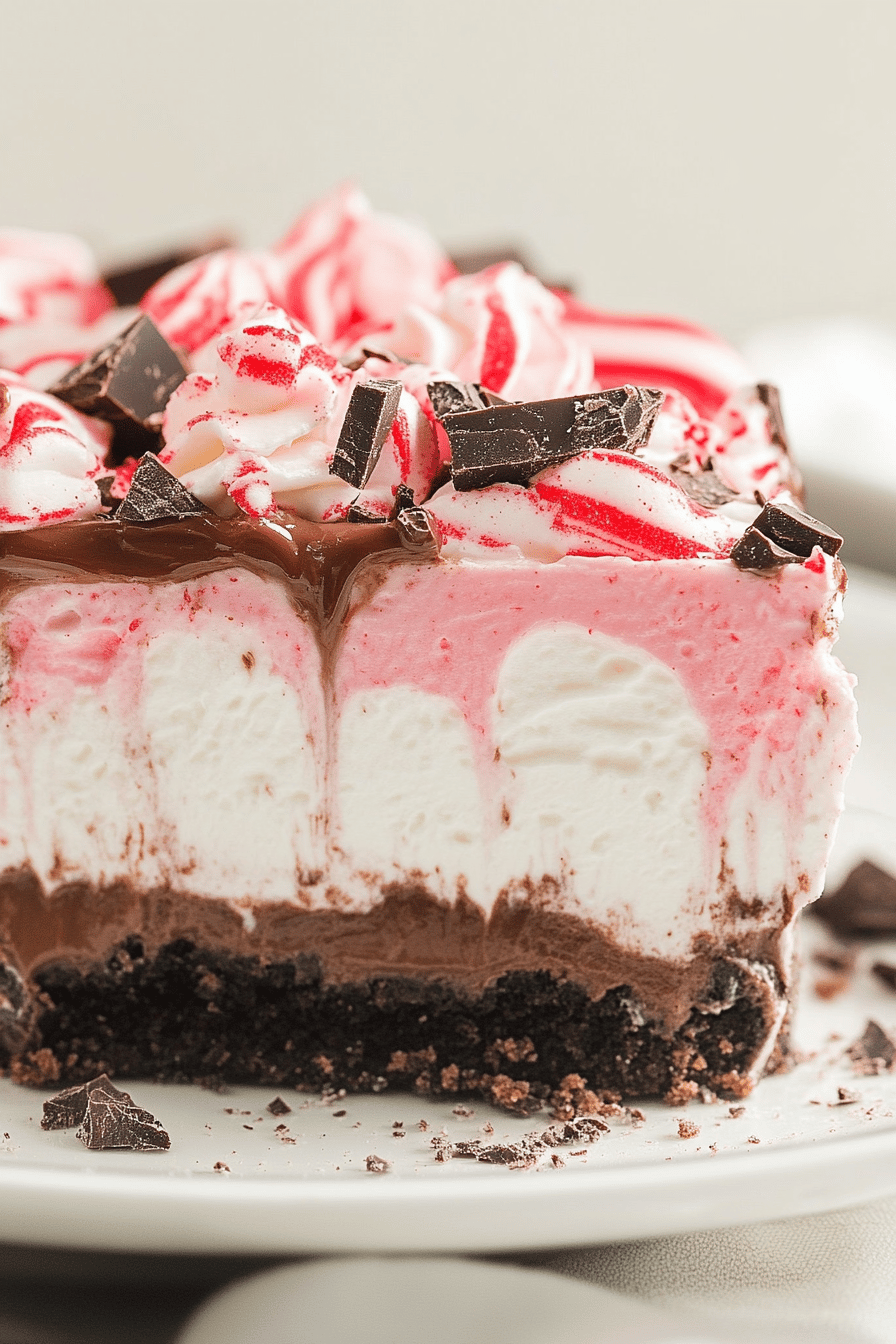
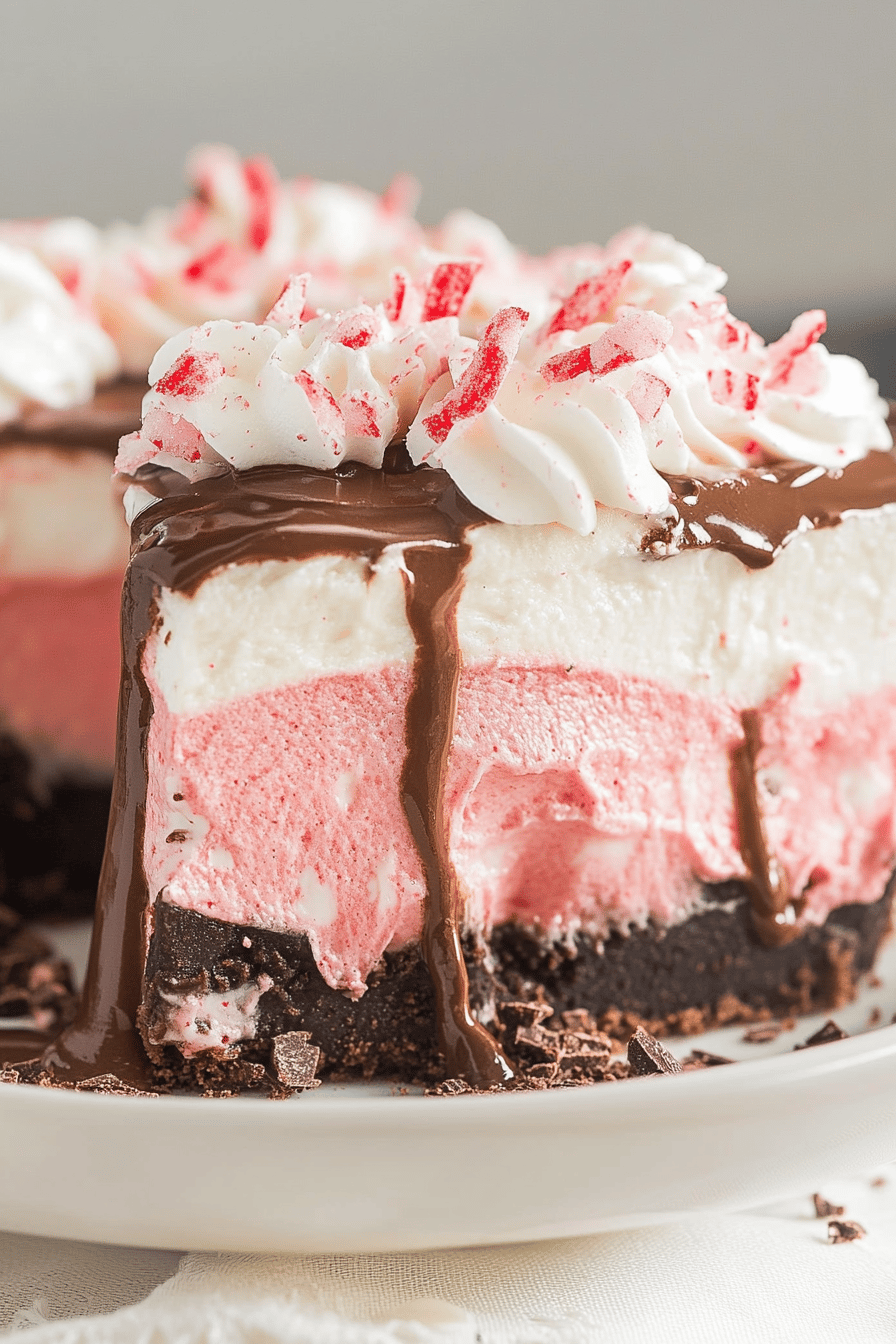
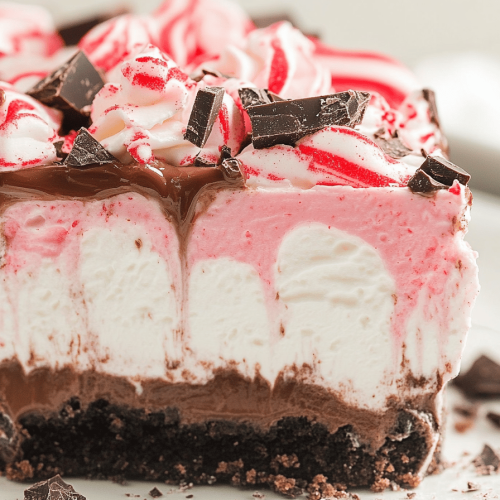
So, what exactly *is* Chocolate Peppermint Lush? Think of it as a dreamy, no-bake dessert that layers simple, delicious components into something truly spectacular. The name ‘lush’ perfectly captures the feeling you get when you take a bite – it’s rich, it’s decadent, it’s just… lush! It’s not quite a cake, not quite a pie, and definitely not just a pudding. It’s its own magical thing. We’re talking about a delightful crumbly base, followed by a silky smooth, creamy chocolate layer, topped with a bright, refreshing peppermint CREAM CHEESE mixture, and finished off with a luscious chocolate ganache or drizzle. It’s the kind of dessert that looks fancy but is secretly so, so easy to put together. It’s the perfect combination of textures and flavors – that satisfying crunch from the base, the velvety smooth chocolate, and the airy, cool peppermint topping. It’s the ultimate comfort dessert that feels a little bit special without demanding hours in the kitchen.
Why you’ll love this recipe?
Honestly, there are so many reasons why I keep coming back to this Chocolate Peppermint Lush, and I have a feeling you’ll feel the same way. First off, the flavor is just out of this world. The deep, rich chocolate mingling with that cool, crisp peppermint is a match made in heaven, especially during the holidays, but I swear I could eat it year-round. It’s that perfect balance of sweet and refreshing. And then there’s the simplicity – and this is a big one for me. You don’t need to turn on your oven at all! That’s a lifesaver on hot summer days or when you’re just not in the mood for baking. The ingredients are all pretty common pantry staples, which means you can whip this up without a special trip to the grocery store, making it incredibly budget-friendly. Plus, it’s so versatile. It’s fantastic as a show-stopping dessert for holiday gatherings, but it’s also perfectly suited for a casual family movie night. What I love most about this Chocolate Peppermint Lush is how forgiving it is. If your swirls aren’t perfect or your ganache is a little rustic, it still turns out absolutely delicious. It’s the kind of recipe you can adapt to your own taste, too. If you’re a huge peppermint fan, you can add a little extra extract, or if you prefer a less sweet dessert, you can easily adjust that. It’s a real crowd-pleaser and always disappears in minutes at my house. It’s that perfect combination of impressive presentation and effortless execution that I always look for in a recipe.
How do I make chocolate peppermint lush?
Quick Overview
This Chocolate Peppermint Lush is a delightful no-bake masterpiece that comes together in just a few simple steps. We’ll start by creating a buttery, cookie crumb base that gets pressed into the pan. Then, a rich, smooth chocolate pudding layer is spread over that. The magic really happens with the luscious peppermint cream cheese topping, which we’ll gently swirl for a beautiful marbled effect. Finally, a simple chocolate drizzle or ganache ties it all together. It’s a forgiving recipe, perfect for beginners and seasoned bakers alike, and the best part is, no oven is required!
Ingredients
For the Main Batter (the delightful base):
2 cups finely crushed chocolate wafer cookies (like Nabisco Famous Chocolate Wafers or Oreos, filling removed if you want it less sweet) – I find that pulsing them in a food processor is the easiest way to get that perfect fine crumb. About 25-30 full-sized cookies usually do the trick for me.
1/2 cup (1 stick) unsalted butter, melted – Use good quality butter; it makes a difference here!
2 tablespoons granulated sugar – Just a touch to sweeten the base slightly.
For the Filling (the creamy chocolate goodness):
1 (3.4 ounce) package instant chocolate pudding mix – Make sure it’s *instant* pudding, not cook-and-serve, for this recipe! It’s crucial for that smooth, no-bake texture.
3 cups milk – I usually use whole milk for the creamiest result, but 2% works too. For a dairy-free option, you could try almond or soy milk, but test it first as the consistency might vary slightly.
1 teaspoon vanilla extract – For that warm, comforting flavor note.
For the Glaze (the finishing touch):
1/2 cup semi-sweet chocolate chips – Or dark chocolate, if you prefer a richer taste.
2 tablespoons unsalted butter – This helps make the glaze smooth and shiny.
Step-by-Step Instructions
Step 1: Preheat & Prep Pan
Grab an 8×8 inch baking dish or a 9-inch pie plate. You don’t need to grease it or anything fancy, as the cookie base has butter in it. Just make sure it’s clean and ready to go. Set it aside for now.
Step 2: Mix Dry Ingredients
In a medium bowl, combine the finely crushed chocolate wafer cookies and the granulated sugar. Give it a good stir with a whisk or a fork to make sure the sugar is evenly distributed throughout the crumbs. This is your base, and we want it consistent!
Step 3: Mix Wet Ingredients
Pour the melted butter over the dry cookie mixture. Use a fork or spatula to stir everything together until the crumbs are evenly moistened. It should look like wet sand and hold together when you squeeze a bit in your hand. This is what ensures your crust has that lovely crumbly-yet-firm texture.
Step 4: Combine
Pour the moistened cookie crumbs into your prepared baking dish or pie plate. Using the bottom of a glass or a flat-bottomed measuring cup, firmly press the crumbs evenly across the bottom of the dish. Make sure to go all the way to the edges. This step is important for a stable crust that won’t fall apart when you slice it later.
Step 5: Prepare Filling
In a separate large bowl, whisk together the instant chocolate pudding mix and the milk. Whisk vigorously for about 2 minutes, or until the pudding starts to thicken. It might look a little thin at first, but trust the process! Stir in the vanilla extract. Let this sit for about 5 minutes to thicken up even more to a pudding-like consistency.
Step 6: Layer & Swirl
Spoon the thickened chocolate pudding evenly over the prepared cookie crust. Gently spread it out with a spatula to cover the entire surface. Now, here comes the fun part! Take a few spoonfuls of your favorite peppermint cream cheese mixture (you can make this by beating softened cream cheese with a little powdered sugar and peppermint extract and a touch of milk until smooth and pipeable) and dollop them over the chocolate pudding layer. Use a toothpick or a knife to gently swirl the peppermint mixture into the chocolate. Don’t over-swirl, or you’ll lose the distinct layers; just a few gentle passes will create a beautiful marbled effect.
Step 7: Bake
Okay, this is where this recipe is a dream – it doesn’t need baking! Once you’ve swirled the layers, cover the dish tightly with plastic wrap. Pop it into the refrigerator and let it chill for at least 4 hours, or preferably overnight. This allows the pudding to set completely and the flavors to meld together beautifully.
Step 8: Cool & Glaze
Once the Chocolate Peppermint Lush is fully chilled and set, it’s time for the final flourish! In a small microwave-safe bowl, combine the semi-sweet chocolate chips and the butter. Microwave in 30-second intervals, stirring between each, until the chocolate is melted and smooth. You can also do this gently over a double boiler. Drizzle the melted chocolate over the top of the chilled dessert. If you want a more decorative look, you can use a fork to create a nice pattern. Let the chocolate set for about 10-15 minutes in the fridge.
Step 9: Slice & Serve
Once the chocolate topping has set, your Chocolate Peppermint Lush is ready to be devoured! Use a sharp knife to cut it into squares or wedges. I like to run my knife under hot water and wipe it dry between cuts for extra clean slices. Serve chilled. The combination of the crumbly base, the smooth chocolate, and the creamy peppermint topping is just divine. Enjoy every delicious bite!
What to Serve It With
This Chocolate Peppermint Lush is honestly a star all on its own, but I love thinking about fun ways to pair it depending on the occasion. For a casual breakfast or brunch, I sometimes like to serve a small slice with a dollop of whipped cream and a few fresh raspberries. It adds a lovely tartness that cuts through the richness, and it looks so pretty! Coffee is an absolute must alongside it, whether it’s a strong black coffee or a creamy latte. If I’m serving it as a proper dessert after dinner, I’ll often pair it with a glass of milk – a childish delight I never outgrew! Sometimes, a scoop of good quality vanilla bean ice cream alongside it is pure bliss. For those cozy snack times, it’s perfect with a mug of hot chocolate or even a small glass of red wine if you’re feeling adventurous. My kids absolutely love it with a big glass of cold milk, and I can’t blame them! It’s just so satisfying and comforting. It’s truly a dessert that fits into any part of the day, feeling both indulgent and wonderfully familiar.
Top Tips for Perfecting Your Chocolate Peppermint Lush
Over the years, I’ve picked up a few tricks for making sure my Chocolate Peppermint Lush turns out absolutely perfect every single time. First, when it comes to the cookie crumb base, make sure your crumbs are truly fine. If they’re too chunky, the base won’t hold together as well. Pulsing them in a food processor is your best friend here. And don’t skimp on pressing it firmly into the pan – this is key for a solid foundation! For the chocolate pudding layer, using *instant* pudding is non-negotiable. The cook-and-serve kind just won’t set up the same way for a no-bake dessert. Whisk it really well until it starts to thicken, and don’t be afraid to let it sit for a few minutes to reach that perfect pudding consistency before layering. Now, for the peppermint swirl, this is where you can really play! I like to make my own by beating softened cream cheese with a little powdered sugar and peppermint extract until it’s smooth. You can add a tiny splash of milk if it’s too stiff. The trick here is to dollop it on and then use a toothpick or a knife to swirl *gently*. You want ribbons of peppermint, not a muddy mess. If you over-swirl, it all just blends together. For the chocolate drizzle, make sure your chocolate and butter are smooth. If it’s too thick, it will just sit in clumps; if it’s too thin, it will run off. I usually aim for a consistency like thick syrup. If it’s too stiff, add a *tiny* bit more butter or a drop of oil, and if it’s too runny, add a few more chocolate chips. Lastly, the chilling time is crucial. While 4 hours is the minimum, I always find that making it the day before and letting it chill overnight yields the absolute best results. The flavors meld, and everything sets up beautifully. Don’t rush this part!
Storing and Reheating Tips
Storing this Chocolate Peppermint Lush is surprisingly easy, which is another reason I love it so much. If you happen to have any leftovers (which is rare in my house!), you can keep it covered tightly with plastic wrap at room temperature for up to 2 days. However, I find it stays freshest and holds its texture best when stored in the refrigerator. Just pop it back into its original baking dish and cover it well. It should stay delicious in the fridge for up to 4-5 days. I’ve found that the textures can sometimes change slightly after a few days, especially the base, but it’s still wonderfully tasty. If you’re planning for a party or want to get a head start, you can definitely make this dessert a day or two in advance and keep it chilled. Now, about reheating – this is a no-bake dessert, so you don’t really “reheat” it. If you’ve stored it in the fridge, just take it out about 15-20 minutes before serving to let it take the chill off slightly. The chocolate glaze might get a little soft if it’s been out for a while, but it firms up again nicely as it cools. I’ve never tried freezing this Chocolate Peppermint Lush, mostly because it’s usually gone too quickly! But if you wanted to try, I’d suggest freezing it *without* the chocolate glaze. You’d need to wrap it very, very well in plastic wrap and then in foil. To thaw, let it sit in the refrigerator overnight. You could then add a freshly made glaze before serving. The key is to ensure it’s completely thawed and chilled before adding any toppings.
Frequently Asked Questions
Final Thoughts
There you have it – my go-to Chocolate Peppermint Lush! I truly hope you get a chance to make this for yourself, your family, or your friends. It’s one of those recipes that brings so much joy with so little effort, and the combination of rich chocolate and cool peppermint is just pure magic. It’s the perfect dessert for when you want something decadent but don’t have the time or inclination for complex baking. It’s impressive enough for a special occasion but comforting enough for a Tuesday night. If you end up making it, please let me know how it turns out in the comments below! I’d love to hear about your variations or any family traditions you create around it. And if you enjoyed this, you might also like my recipe for [Link to a similar recipe, e.g., No-Bake Chocolate Cheesecake] or my [Link to another related recipe, e.g., Easy Peppermint Bark Brownies]. Happy baking (or in this case, happy no-baking)! I can’t wait to hear what you think.
Chocolate Peppermint Lush
Ingredients
Crust
- 2 cups crushed chocolate cookies
- 0.25 cup butter melted
Peppermint Layer
- 1 package cream cheese softened
- 0.5 cup powdered sugar
- 1 teaspoon peppermint extract
- 1 cup whipped topping thawed
Chocolate Layer
- 0.5 cup chocolate pudding mix instant
- 2 cups milk
Topping
- 1 cup whipped topping thawed
- 0.25 cup chocolate shavings
- 0.25 cup crushed peppermint candies
Instructions
Preparation Steps
- In a medium bowl, combine the crushed chocolate cookies and melted butter. Press the mixture evenly into the bottom of a 9x13 inch baking dish.
- In a separate bowl, beat together the softened cream cheese, powdered sugar, and peppermint extract until smooth. Gently fold in 1 cup of whipped topping.
- Spread the cream cheese mixture evenly over the cookie crust.
- In another bowl, whisk together the instant chocolate pudding mix and milk until well combined and slightly thickened. Let stand for 5 minutes.
- Spread the chocolate pudding mixture over the cream cheese layer.
- Top with the remaining 1 cup of whipped topping. Sprinkle with chocolate shavings and crushed peppermint candies.
- Refrigerate for at least 2 hours before serving.