Oh, I am so incredibly excited to share this recipe with you today! This Unicorn Poke Cake isn’t just a dessert; it’s pure joy baked into a cake. I remember the first time I made this for a neighborhood potluck, and honestly, it was the star of the show. Kids were practically fighting over the last slice, and the adults were just as smitten. It’s got that magical, whimsical feel that just makes any day a little bit brighter. If you’ve ever loved a classic pineapple poke cake but wanted something that screams ‘celebration,’ you’re in for a treat. This is way more fun than a regular chocolate cake, and surprisingly, it’s just as easy to whip up, if not easier! It’s that perfect dessert that looks like you spent hours on it, but secretly, you know it was a breeze.
What is a unicorn poke cake?
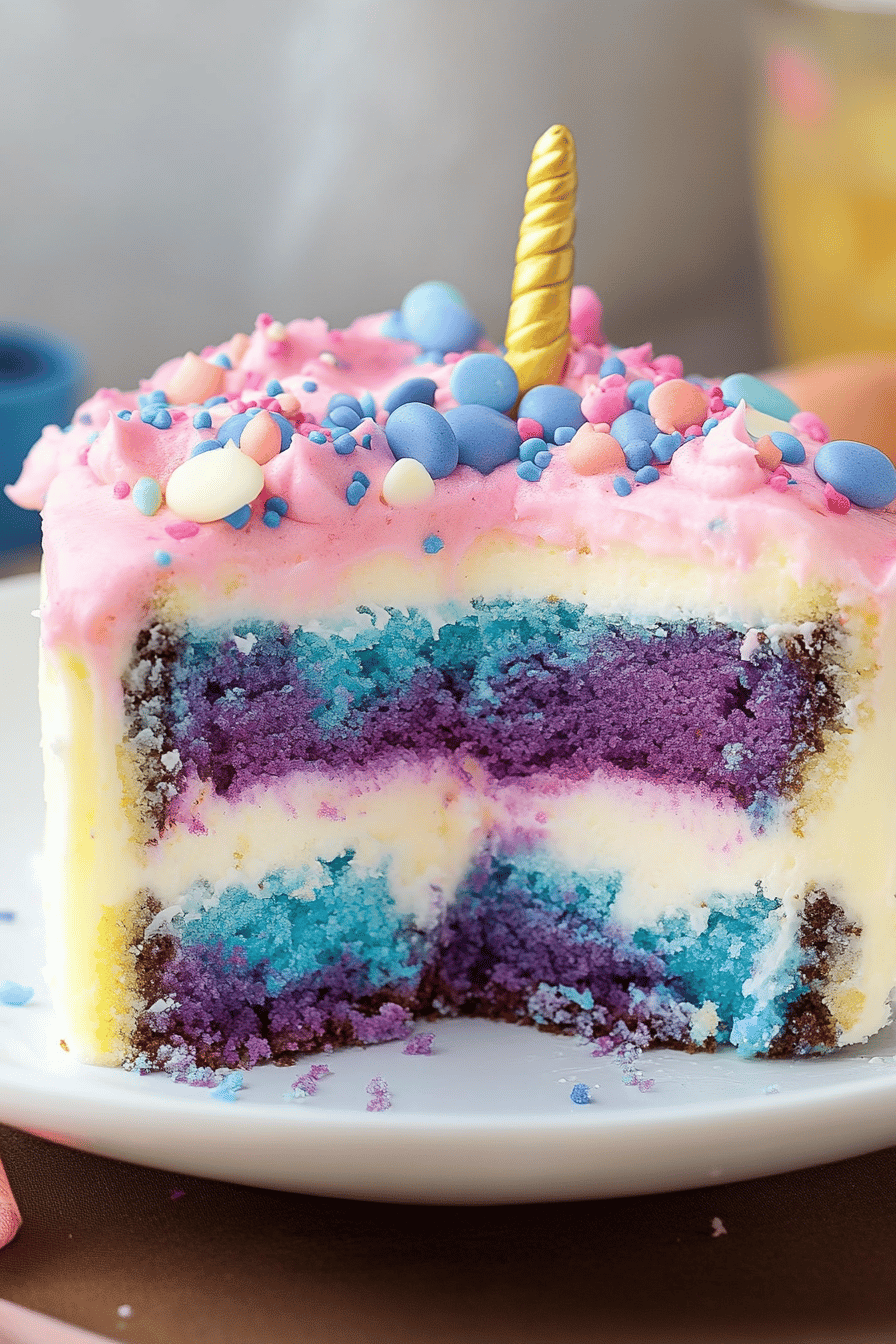
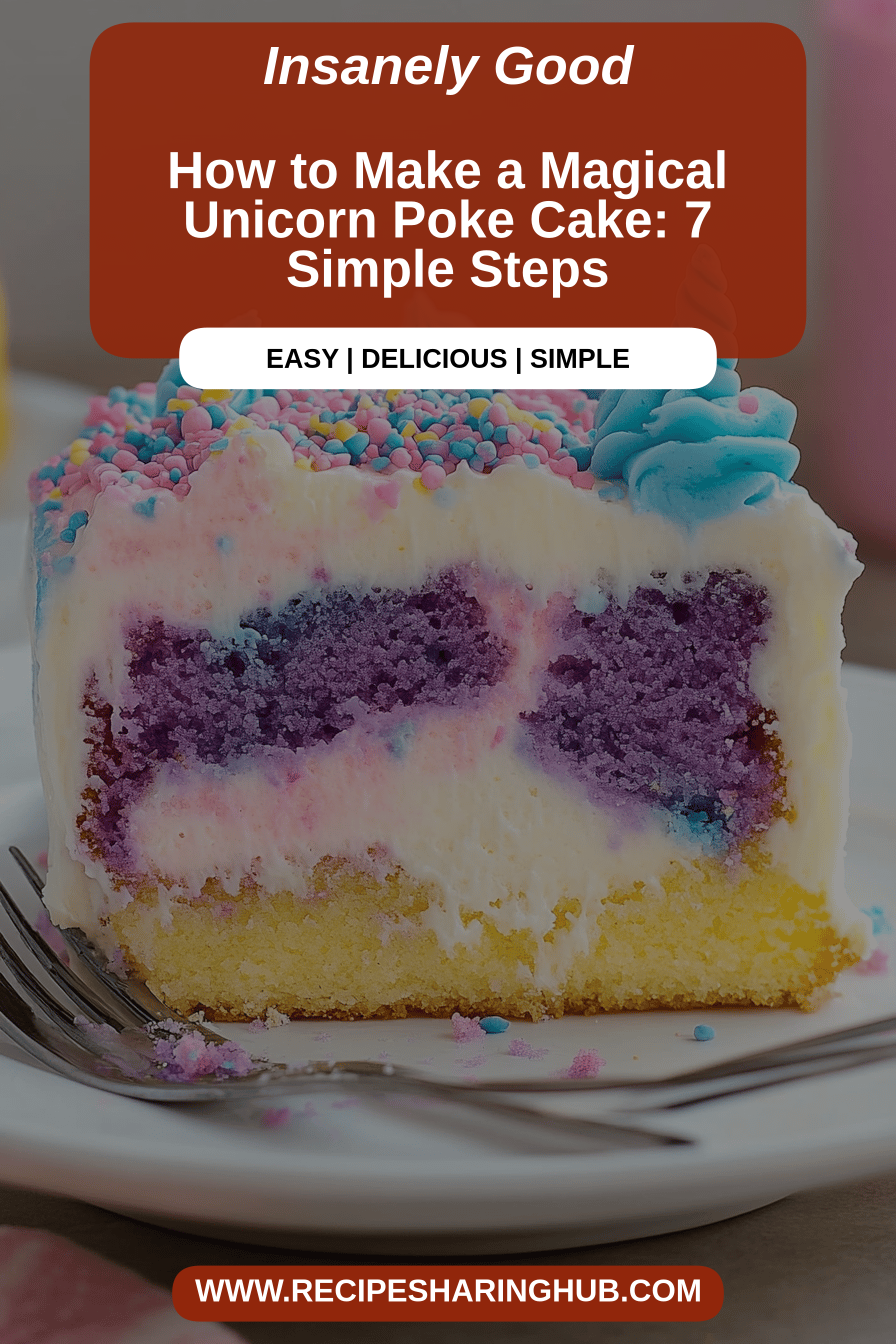
So, what exactly is a Unicorn Poke Cake? Think of it as a delightful twist on the classic poke cake concept. You know, the one where you poke holes into a baked cake and pour a glorious, sweet liquid over it? Well, this version takes that idea and injects it with a massive dose of color and fun. We’re talking vibrant, swirling colors that remind you of a unicorn’s mane or a rainbow after a fresh rain. It’s essentially a moist, tender white cake, but the magic happens *after* it’s baked. We poke it full of holes, then drench it in a sweet, luscious liquid (more on that later!), and top it all off with a dreamy, fluffy frosting and sprinkles galore. It’s a party in every bite, and the name ‘Unicorn’ just perfectly captures that sense of wonder and delight. It’s not overly complicated; it’s just wonderfully festive and delicious!
Why you’ll love this recipe?
There are so many reasons why this Unicorn Poke Cake has become a go-to in my kitchen, and I just know you’re going to fall in love with it too. Firstly, the FLAVOR is just out of this world. It’s sweet, yes, but in a perfectly balanced way. The cake itself is so tender and moist, and the filling seeps down into every nook and cranny, creating this wonderfully decadent experience. It’s not just sweet; it has a subtle vanilla aroma that’s just heavenly. Then there’s the SIMPLICITY. Seriously, this is a lifesaver for busy weekends or when unexpected guests pop over. You can practically have it ready to go with minimal effort. I’ve made this with my nieces and nephews, and they had an absolute blast helping with the ‘decorating’ part. Plus, it’s incredibly COST-EFFECTIVE! Most of the ingredients are pantry staples, meaning you don’t need to break the bank to make something truly spectacular. It’s far more budget-friendly than buying a fancy cake from a bakery. And the VERSATILITY! While the unicorn theme is fantastic for birthdays or themed parties, you can easily adapt the colors and sprinkles for any occasion. It’s perfect as a celebratory dessert, a weekend treat, or even just when you’re craving something sweet and delightful. What I love most is the sheer WOW factor it has without being overly complicated. It truly looks like a masterpiece, but it’s remarkably approachable for any home baker. It’s definitely a step up from your everyday sheet cake, but it doesn’t require any fancy decorating skills, which is a huge win in my book!
How do you make a unicorn poke cake?
Quick Overview
This recipe is all about creating a vibrant, flavorful, and Super Moist cake that’s as fun to look at as it is to eat. We’ll start by baking a simple white cake from scratch, then, once it’s cooled slightly, we’ll poke it all over and let a rainbow of sweetened condensed milk and colored liquids soak in. The final flourish is a cloud-like whipped topping and a generous sprinkle of magic. It’s a straightforward process that guarantees a show-stopping dessert with minimal fuss. You’ll love how easily the flavors meld together!
Ingredients
For the Main Batter:
- 3 cups all-purpose flour
- 1 ½ cups granulated sugar
- 3 ½ teaspoons baking powder
- ½ teaspoon salt
- ½ cup unsalted butter, softened
- 1 ½ cups milk (whole milk or 2% works best for richness)
- 3 large eggs
- 1 teaspoon vanilla extract
When it comes to the flour, make sure it’s all-purpose – nothing fancy needed here! For the sugar, granulated is your best bet. Baking powder is key for that lovely lift. And softened butter is a must; it incorporates much better into the batter. I’ve found that whole milk or 2% milk gives the best texture and richness, but you can certainly experiment if you have dietary needs (more on that later!). The eggs should be at room temperature; they emulsify better that way. And good quality vanilla extract makes all the difference in a white cake!
For the Filling:
- 1 (14 ounce) can sweetened condensed milk
- Food coloring (gel food coloring works best for vibrant colors: red, orange, yellow, green, blue, purple)
This is where the magic really starts to happen! The sweetened condensed milk is the secret to that unbelievably moist and tender crumb. It’s already got that lovely sweetness and a creamy texture. For the colors, I highly recommend using gel food coloring. They are super concentrated, so you need just a tiny bit to get those really vibrant, almost neon hues that scream ‘unicorn’! You can find them at most craft stores or the baking aisle of your grocery store. Have fun choosing your favorite rainbow combination!
For the Glaze:
- 1 (8 ounce) container whipped topping, thawed (like Cool Whip)
- Assorted sprinkles (rainbow sprinkles, star sprinkles, edible glitter – get creative!)
This is your dreamy, fluffy cloud of deliciousness! The thawed whipped topping creates a light and airy finish that perfectly complements the rich, moist cake. Make sure it’s fully thawed but not watery. And for the sprinkles? This is your chance to go wild! I love a mix of classic rainbow jimmies, some fun star shapes, and maybe even a touch of edible glitter if you’re feeling extra fancy. The more colorful, the better!
Step-by-Step Instructions
Step 1: Preheat & Prep Pan
First things first, get that oven preheating to 350 degrees Fahrenheit (175 degrees Celsius). This ensures the oven is nice and hot when your cake is ready to bake. Now, grab a 9×13 inch baking pan. I always like to grease it really well and then flour it. You can also use parchment paper for the bottom, which makes it super easy to lift the cake out later if you want to serve it on a platter. Just make sure the parchment paper doesn’t go all the way up the sides, or it might curl up during baking. Give it a good spray with baking spray or use butter and flour – whatever you normally do to make sure your cakes don’t stick. This is one of those steps that seems small, but it’s a lifesaver for easy cleanup and perfect cake removal!
Step 2: Mix Dry Ingredients
In a large mixing bowl, whisk together your flour, granulated sugar, baking powder, and salt. Whisking them together well ensures that the leavening agent (baking powder) and salt are evenly distributed throughout the flour. This means your cake will rise evenly and have a consistent flavor. You don’t want any pockets of salt or baking powder! I usually just use a whisk for this – it’s quick and efficient and gets rid of any little lumps. The goal here is a uniform, fluffy mixture. It smells so promising already!
Step 3: Mix Wet Ingredients
In a separate medium bowl, beat together your softened butter and sugar until light and fluffy. This is called creaming, and it’s super important for creating a tender cake. It’s not just about mixing; it’s about incorporating air! Then, gradually add your milk, eggs, and vanilla extract. Beat until everything is just combined. Don’t overmix here! We want it smooth and well-emulsified. If your eggs are cold, you might notice it looks a little bit curdled at first, but keep beating, and it should smooth out. If it still looks a bit off, don’t worry too much; the dry ingredients will help bring it all together.
Step 4: Combine
Now, it’s time to bring those wet and dry ingredients together. Gradually add the dry ingredients to the wet ingredients, mixing on low speed (or by hand with a spatula) until just combined. Scrape down the sides of the bowl as needed. The key here is *not to overmix*. Overmixing develops the gluten in the flour too much, which can lead to a tough or rubbery cake. You want to mix until you no longer see streaks of flour. A few tiny lumps are okay. The batter should be smooth but not overworked. It will be fairly thick, which is exactly what we want for a sturdy cake that can hold all that delicious filling!
Step 5: Prepare Filling
This is the fun, colorful part! Open your can of sweetened condensed milk. Divide it into small bowls – as many bowls as you want colors, usually 4-6 is perfect for a good rainbow effect. Add a few drops of gel food coloring to each bowl. Start with just a drop or two, stir well, and then add more if you want a more intense color. Remember, gel colors are potent! Stir each color until it’s completely uniform. The vibrant colors against the creamy white condensed milk are just mesmerizing. You’ll be tempted to taste it, but resist! It’s for the cake!
Step 6: Layer & Swirl
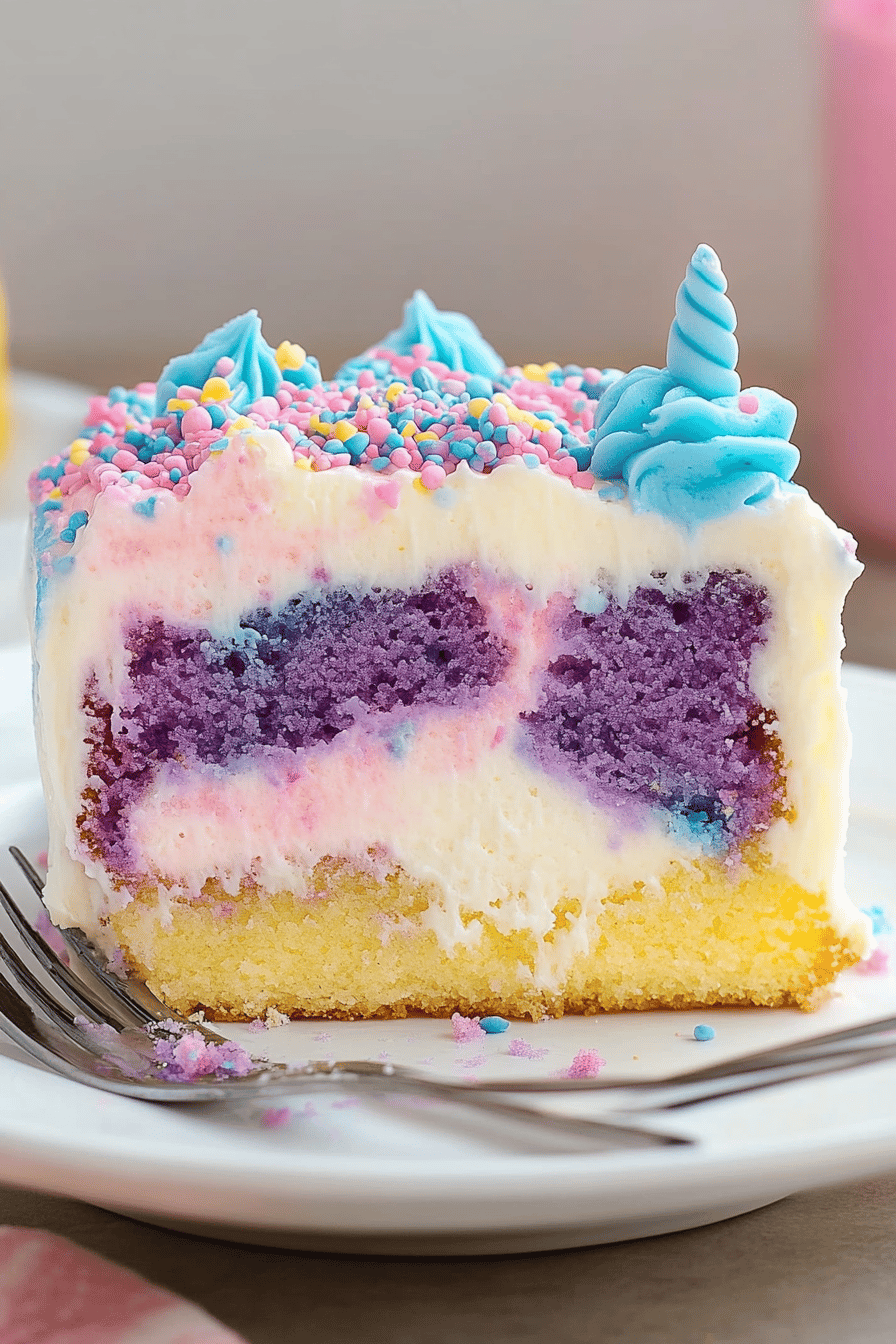
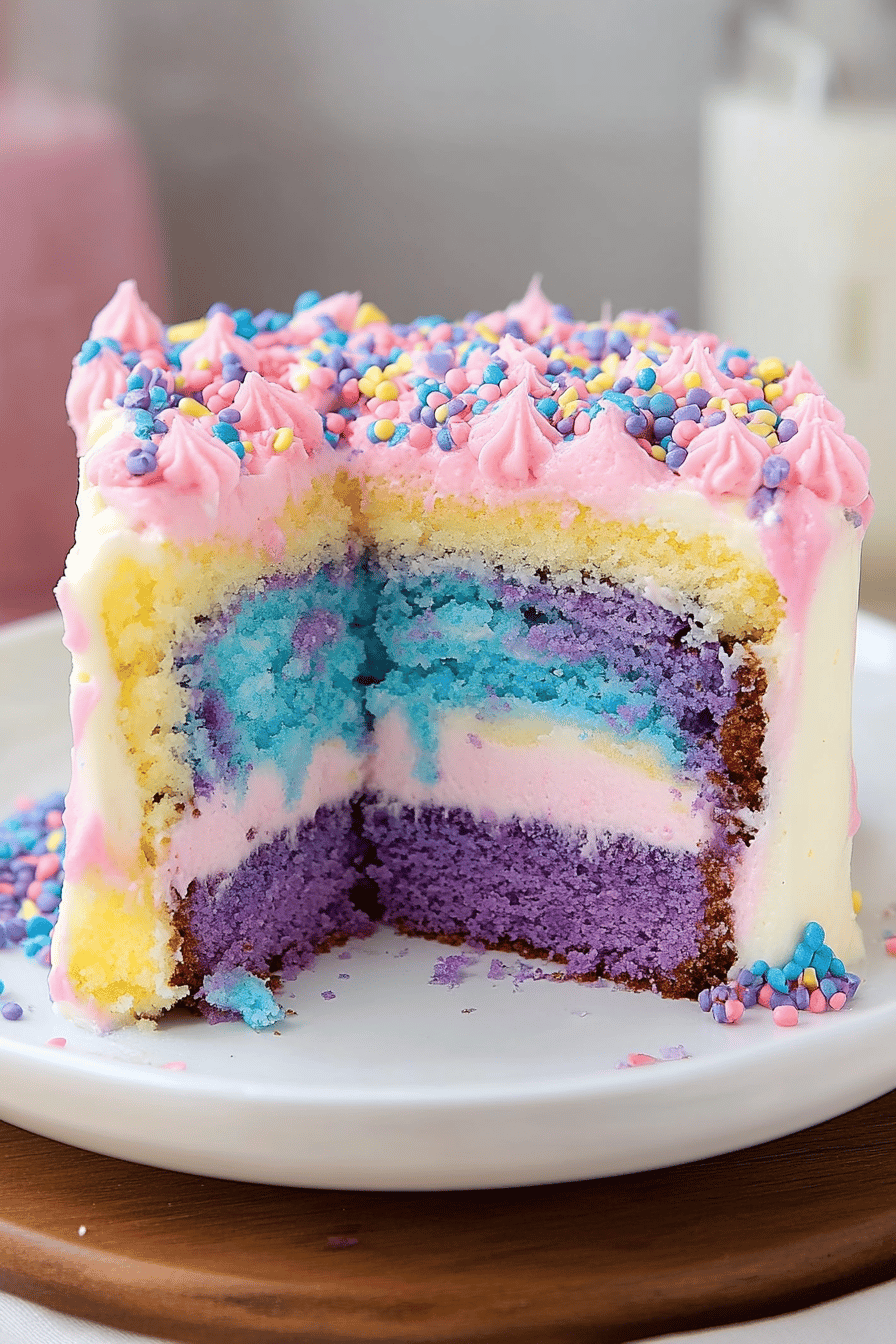
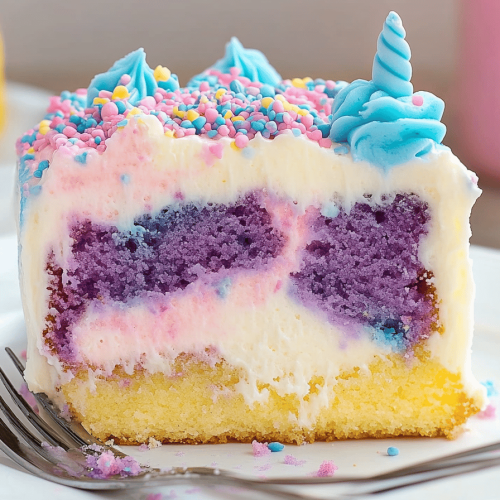
Pour your Cake Batter evenly into the prepared 9×13 inch pan. Smooth the top with a spatula. Now, grab a fork or a skewer and poke holes all over the surface of the cake. Make them deep, but don’t go all the way through to the bottom. You want them to go about two-thirds of the way down. Once you’ve got your holes, it’s time for the color! Drizzle spoonfuls of each colored sweetened condensed milk mixture randomly over the poked cake. You can go in a pattern, or just go with the flow! Then, gently swirl the colors together using a skewer or the back of a spoon. Don’t over-swirl, or the colors will blend into one muddy shade. Aim for distinct swirls and patches of color. It’s supposed to look magical, not messy!
Step 7: Bake
Pop that beautiful, swirled cake into your preheated oven. Bake for about 30-35 minutes, or until a wooden skewer or toothpick inserted into the center comes out clean. The edges should be lightly golden brown and pulling away from the sides of the pan. Every oven is a little different, so keep an eye on it during the last 10 minutes. If the top starts to brown too quickly, you can loosely tent it with foil. Once it’s done, carefully remove it from the oven and let it cool in the pan on a wire rack for about 15-20 minutes. This is crucial, as it allows the cake to set up properly before we add the topping.
Step 8: Cool & Glaze
After that initial cooling period in the pan, it’s time to add the magical topping! Gently spread the thawed whipped topping evenly over the slightly cooled cake. Make sure you get it all the way to the edges. Don’t worry if the cake is still a little warm; the whipped topping will hold up just fine. Now for the grand finale: sprinkles! Shower your cake with an abundance of assorted sprinkles. This is where your Unicorn Poke Cake truly comes to life. Go wild with colors and shapes! The sprinkles stick beautifully to the whipped topping and add that final touch of whimsy. For best results, chill the cake for at least an hour (or longer!) before slicing to allow the topping to set and the flavors to meld.
Step 9: Slice & Serve
Once chilled and firm, it’s time to slice and serve this beauty! Use a sharp knife to cut into generous squares. The colors will be absolutely stunning when you lift each piece. Serve it chilled for the best texture. This cake is a showstopper on its own, but you can certainly pair it with a dollop of whipped cream or a scoop of vanilla ice cream if you’re feeling extra indulgent. I always love to see the amazed looks on people’s faces when they get their first bite. It’s such a rewarding dessert!
What to Serve It With
This Unicorn Poke Cake is so versatile, it honestly shines on its own, but pairing it with the right accompaniments can elevate the whole experience. For breakfast, if you’re feeling adventurous (or have leftovers!), a small slice with a strong cup of coffee is surprisingly delightful. The sweetness cuts through the bitterness of the coffee beautifully. For brunch, I love serving this with fresh berries like raspberries and blueberries. The tartness of the berries balances the sweetness of the cake perfectly, and the colors just pop against the pastel swirls. A light, fluffy mimosa or a sparkling cider also pairs wonderfully. As a dessert, it’s obviously a winner! It’s fantastic served after a hearty meal, especially if you’ve had something savory. A small scoop of vanilla bean ice cream or even a light raspberry sorbet is a classic combination. For those cozy snack times, when you just need a little pick-me-up, a glass of cold milk is the ultimate pairing. My kids always insist on milk with their cake, and honestly, it’s hard to argue with that classic comfort! It’s also wonderful served with a side of fresh fruit salad for a lighter, refreshing contrast.
Top Tips for Perfecting Your Unicorn Poke Cake
I’ve made this Unicorn Poke Cake more times than I can count, and over the years, I’ve picked up a few tricks that I swear by. For the cake batter, remember that the key to a tender crumb is to not overmix once you combine the wet and dry ingredients. Mix until just combined, and you’ll have a beautiful, soft cake. If you’re tempted to add more liquid to make it thinner, resist! The batter is meant to be thick. When it comes to poking the cake, I always use a fork or a skewer and go about two-thirds of the way down. This ensures the filling gets deep into the cake without making it soggy. For the swirl effect, don’t overdo it! Gentle swirls with a skewer are all you need. If you swirl too much, the colors will become muddy. Less is more here for that beautiful marbled effect. Regarding ingredient swaps, I’ve tested this with different types of milk, and while whole milk gives the richest result, 2% is perfectly fine. I haven’t tried dairy-free milk yet, but I imagine a good quality unsweetened almond or soy milk would work, though you might get a slightly different texture. For the whipped topping, ensure it’s fully thawed but still firm. If it’s too runny, it won’t spread nicely, and the sprinkles might sink. And for the ultimate frosting-like consistency, you can even fold in a tablespoon or two of CREAM CHEESE when you whip it up! For baking, always use the correct pan size (9×13 inches). Using a smaller pan can cause the cake to overflow, and a larger one might result in an overly thin cake. Always do the toothpick test to ensure it’s baked through; ovens can vary wildly. And a final tip for the most magical presentation: chill the cake for at least an hour before serving. This allows the whipped topping to firm up and the flavors to meld beautifully, making it easier to slice and ensuring that gorgeous, colorful interior stays intact when you serve it!
Storing and Reheating Tips
One of the best things about this Unicorn Poke Cake is how well it stores! Since it has that creamy topping and moist filling, it actually gets even better the next day. At room temperature, it’s best to keep it covered for no more than a couple of hours, especially if your house is warm. The whipped topping can soften up quickly. For refrigerator storage, this is your best bet for keeping it fresh for longer. Cover the cake tightly with plastic wrap or transfer slices to an airtight container. It should stay delicious for about 3-4 days in the fridge. The moisture from the filling actually helps keep the cake incredibly fresh. If you’re planning on making this ahead for a party or just want to stash some away, it freezes beautifully. You can freeze the unfrosted cake (after it has baked and cooled completely) by wrapping it tightly in plastic wrap and then aluminum foil. It’ll keep in the freezer for up to 2-3 months. Once you’re ready to serve, thaw it overnight in the refrigerator, then frost and decorate. If you freeze the fully assembled cake, just be aware that the whipped topping might not be as firm after thawing. I usually prefer to freeze the unfrosted cake and frost it just before serving for the best texture. For reheating, you generally don’t need to reheat this cake since it’s served cold or at room temperature. However, if it’s been refrigerated and you prefer it a bit softer, you can let it sit out for about 30 minutes before serving. It’s honestly delicious straight from the fridge!
Frequently Asked Questions
Final Thoughts
Honestly, this Unicorn Poke Cake is more than just a recipe; it’s an experience. It’s about bringing a little bit of magic and a whole lot of joy to your table. The vibrant colors, the incredibly moist texture, and the sweet, delightful flavor make it an instant favorite for any celebration or just because. I hope you’ve enjoyed diving into this recipe with me today. It’s one of those cakes that truly makes people smile, and that’s what cooking is all about, right? If you loved this, you might also enjoy my Rainbow Sherbet Cake or my Funfetti Cupcakes for more colorful, celebratory treats. Don’t be afraid to get creative with your colors and sprinkles – make it your own! I can’t wait to hear how your Unicorn Poke Cake turns out! Please leave a comment below to share your thoughts, any variations you tried, or your own magical moments with this cake. Happy baking, and may your day be as bright and colorful as this cake!
Unicorn Poke Cake
Ingredients
Cake Ingredients
- 1 box white cake mix plus ingredients called for on the box (eggs, oil, water)
- 3 oz strawberry gelatin
- 3 oz lime gelatin
- 3 oz berry blue gelatin
- 3 oz grape gelatin
- 0.5 cup sweetened condensed milk
Frosting Ingredients
- 8 oz cream cheese softened
- 0.5 cup unsalted butter softened
- 4 cup powdered sugar
- 1 teaspoon vanilla extract
- 0.25 cup milk or heavy cream, as needed
Toppings
- 1 cup rainbow sprinkles
Instructions
Cake Preparation
- Preheat oven to 350°F (175°C). Grease and flour a 9x13 inch baking pan.
- Prepare the white cake mix according to package directions. Pour batter into the prepared pan.
- Bake for 25-30 minutes, or until a toothpick inserted into the center comes out clean. Let the cake cool in the pan for 10 minutes, then invert it onto a wire rack to cool completely.
Jell-O Soaking
- Once the cake is completely cooled, poke holes all over the top and sides of the cake using the handle of a wooden spoon or a skewer.
- In separate bowls, prepare each flavor of gelatin according to package directions, but use only 1 cup of boiling water for each (instead of the amount listed on the package).
- Carefully pour each prepared gelatin mixture over the cake, allowing it to soak into the holes. Alternate colors for a marbled effect. You may need to pour some gelatin multiple times to ensure it covers most of the cake.
- Refrigerate the cake for at least 2-3 hours, or until the gelatin is set.
Frosting and Topping
- In a large bowl, beat together the softened cream cheese and butter until smooth and creamy.
- Gradually add the powdered sugar, alternating with the milk, beating until the frosting is smooth and spreadable. Stir in the vanilla extract.
- Spread the frosting evenly over the top of the set Jell-O.
- Sprinkle generously with rainbow sprinkles.
- Refrigerate for at least 30 minutes before slicing and serving.