You know those days, right? The ones where a craving hits – a serious, can’t-ignore-it craving for something warm, sweet, and comforting – but the thought of pulling out a dozen ingredients and spending hours in the kitchen just feels… impossible. That’s precisely when this 3-ingredient peach cobbler comes to my rescue. It’s the kind of recipe that feels like a hug in a bowl. My grandma used to make a version of this when I was a kid, and the smell of warm peaches and cinnamon wafting through the house was pure magic. It’s so simple, yet the flavor is out of this world. Honestly, when people ask me for a foolproof dessert that always impresses, this is my go-to. It’s a game-changer, especially when compared to those elaborate apple pies or complex cakes that demand so much more. This peach cobbler is pure, unadulterated comfort with minimal fuss.
What is a 3-ingredient peach Cobbler?
So, what exactly *is* this magical 3-ingredient peach cobbler? At its heart, it’s exactly what it sounds like: a delicious, bubbling fruit dessert that requires only three main components. Think of it as a simplified, deconstructed cobbler where the biscuit topping and the fruit filling are almost one glorious entity. It’s a less fussy cousin to a traditional cobbler, skipping the separate dough-making step. Instead, we’re using a clever shortcut that combines everything into one simple mixture that bakes into a dreamy, cake-like topping right over the juicy peaches. It’s essentially a peach Dump Cake meets a cobbler, but so much better because of its sheer simplicity and the way the flavors meld together. It’s designed to be effortless, a lifesaver for busy weeknights or when you’re entertaining unexpected guests and want to whip up something truly special without breaking a sweat.
Why you’ll love this recipe?
There are so many reasons why this 3-ingredient peach cobbler has earned a permanent spot in my recipe rotation, and I know you’ll fall in love with it too. First off, let’s talk about that *flavor*. Even with just three ingredients, the taste is phenomenal. You get the sweet, slightly tart burst of warm peaches, perfectly complemented by the tender, buttery-sweet topping. It’s pure comfort food bliss. Then there’s the sheer simplicity of it all. I’ve made this with my kids helping, and they still manage to nail it. It’s incredibly forgiving. You honestly can’t mess this one up, which is a huge win in my book. It’s also remarkably cost-effective. The ingredients are pantry staples for many, making it an economical choice for a sweet treat. And the versatility! While peaches are divine, I’ve had fun experimenting with other fruits too, which I’ll get to later. It’s perfect when you’re craving something sweet at 10 pm but don’t want to bake a whole cake, or when you need a crowd-pleasing dessert that doesn’t require advanced culinary degrees. What I love most about this is that it feels homemade and special, even though it takes next to no effort. It’s a testament to the fact that sometimes, the simplest things are truly the best.
How do I make a 3-ingredient Peach Cobbler?
Quick Overview
Get ready for the easiest dessert you’ll ever make! In just a few simple steps, you’ll have a bubbling, golden-brown peach cobbler ready to devour. We’ll simply combine our ingredients, pour them into a baking dish, and let the oven do all the magic. It’s so straightforward, you’ll wonder why you ever bothered with more complicated recipes. This method ensures a moist, cakey topping that beautifully contrasts with the soft, sweet peaches underneath, all without needing separate bowls for wet and dry ingredients or fussy techniques.
Ingredients
For the Main Batter:
1 box (15.25 oz) yellow cake mix: This is the magic ingredient! Don’t use a “moist” or “Super Moist” variety; a standard yellow cake mix works best. I find that a good quality, basic yellow cake mix provides the perfect structure and subtle sweetness that bakes up into a tender, almost biscuit-like topping. It’s important that it’s a *dry* cake mix, not a pre-made batter. The oil and eggs in the mix will come later!
1 can (14.5 oz) evaporated milk: This is key to creating that wonderfully creamy, slightly condensed milk-like texture in the topping. It’s richer than regular milk and really elevates the final dessert. Make sure you grab evaporated milk and not sweetened condensed milk – they’re very different!
2 cans (15 oz each) sliced peaches in syrup, undrained: Don’t drain the syrup! That starchy, sweet liquid is essential for creating the gooey peach layer and helps moisten the cake mix. I prefer sliced peaches because they distribute evenly, but chunks would work too. Just make sure they are in syrup, not juice, for the best flavor and texture. If you can find peaches packed in light syrup, that’s a great option too for a slightly less sweet result.
Step-by-Step Instructions
Step 1: Preheat & Prep Pan
First things first, let’s get our oven preheated. Set your oven to 350°F (175°C). While it’s heating up, grab an 8×8 inch baking dish or a similar-sized oven-safe skillet or casserole dish. You don’t need to grease it; the syrupy peaches and the cake mix topping create enough richness to prevent sticking. I’ve tried this in a 9×13 inch pan before, but it makes the topping a bit too thin, so stick to the 8×8 for that perfect cobbler thickness.
Step 2: Mix Dry Ingredients
Now, this is where the simplicity truly shines. You don’t need to mix dry ingredients separately! Grab your 8×8 inch baking dish. Open up your two cans of sliced peaches in syrup and pour them directly into the baking dish, making sure to get all that delicious syrup. Spread the peaches out evenly across the bottom of the dish. You want a nice, even layer of fruit for the topping to bake over.
Step 3: Mix Wet Ingredients
Again, no separate bowls needed! This recipe is all about minimizing cleanup. Take your can of evaporated milk. You’re going to pour this evenly over the peaches in the baking dish. Then, grab your dry yellow cake mix. Sprinkle the *entire* box of dry cake mix evenly over the top of the evaporated milk and peaches. Don’t stir it in! Just let it fall like a snowy blanket over the fruity goodness. It might look a little strange, but trust the process!
Step 4: Combine
This is the “combining” step, and it’s more about coaxing than mixing. You don’t want to overmix here at all. In fact, you’re not really mixing at all! You’re just going to gently smooth out the dry cake mix so it’s a somewhat even layer. You can use the back of a spoon or a small spatula. Don’t worry if there are a few dry spots or lumps; they’ll bake out. The goal is just to cover the peaches and milk as uniformly as possible. Resist the urge to stir everything together into a uniform batter. That’s not what we’re going for here!
Step 5: Prepare Filling
The “filling” is already prepared in Step 2! The peaches and their syrup are already in the dish, ready to be topped. The magic happens as it bakes, with the cake mix absorbing some of the liquid and forming a tender, cake-like topping that’s infused with peach flavor. The evaporated milk helps create that beautiful, custardy layer beneath the cakey crust. It’s really that simple – the filling is already there!
Step 6: Layer & Swirl
There’s no real layering or swirling involved in this particular 3-ingredient recipe; it’s more of a dump-and-bake situation. The cake mix sits on top of the peaches and evaporated milk. As it bakes, the cake mix will absorb the liquid and puff up, creating a delicious, golden-brown topping that is wonderfully tender and cakey. Any “swirling” that happens is done by the oven’s heat and the interaction of the ingredients themselves, creating little pockets of creamy peach and tender cake. It creates its own beautiful pattern naturally.
Step 7: Bake
Now, pop that baking dish into your preheated oven. Bake for about 45-55 minutes. The exact time can vary depending on your oven, so keep an eye on it. You’re looking for a beautiful golden-brown topping that’s set and cooked through. The edges should be bubbling merrily, and a toothpick inserted into the cakey part should come out mostly clean. If the top is browning too quickly before the center is cooked, you can loosely tent it with aluminum foil for the last 10-15 minutes of baking.
Step 8: Cool & Glaze
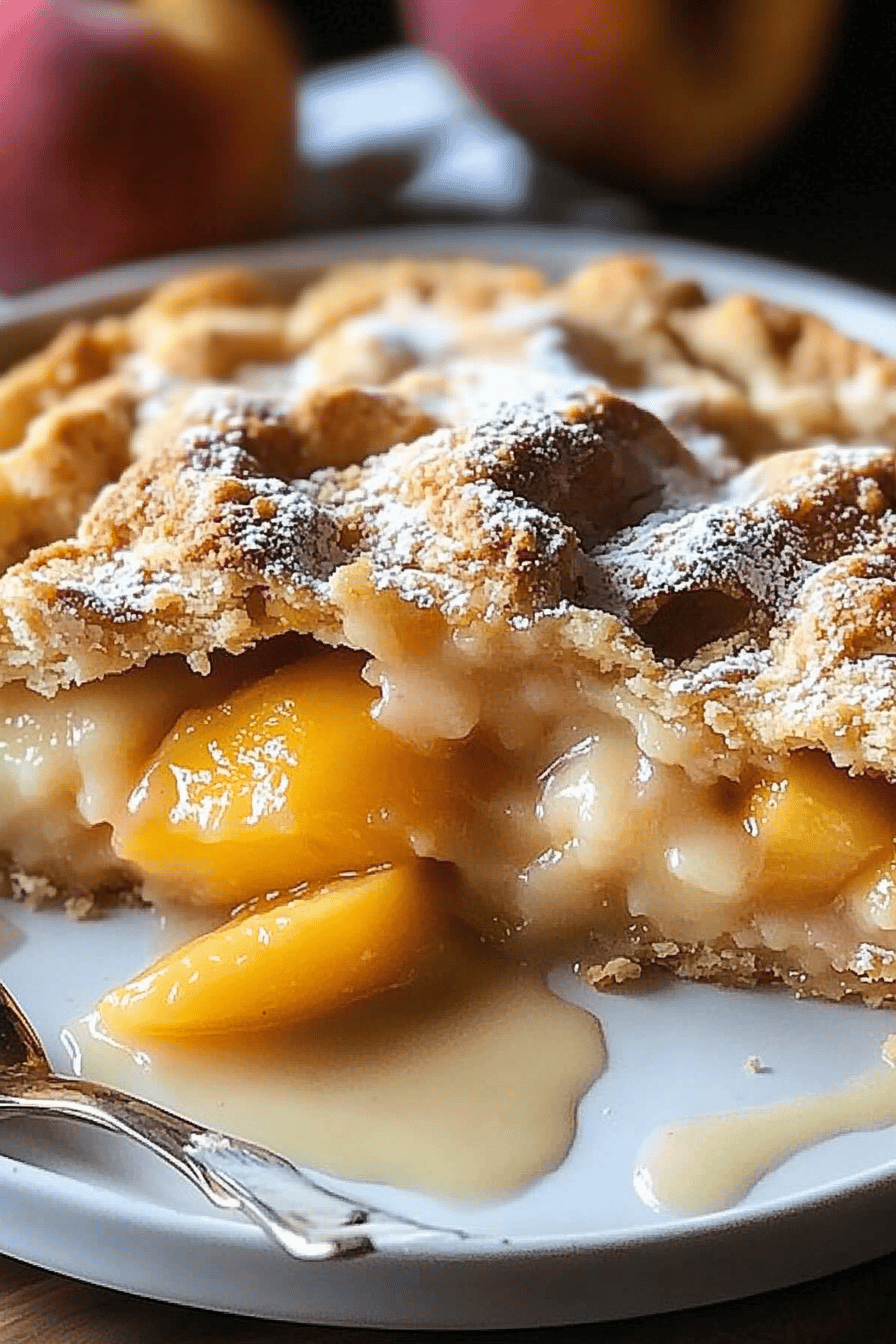
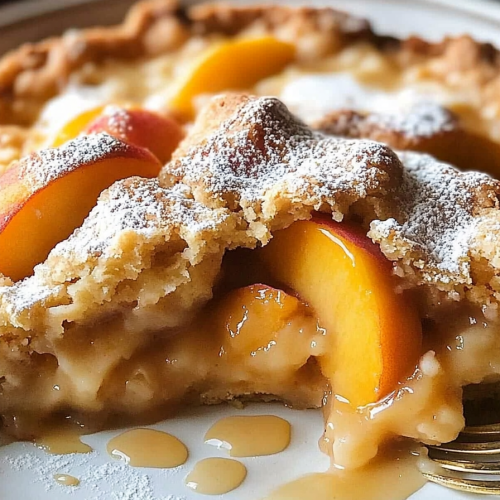
Once it’s done, carefully remove the cobbler from the oven. Let it cool for at least 10-15 minutes before serving. This is important! It allows the cobbler to set up a bit, making it easier to scoop and preventing you from burning your mouth on molten-hot peaches. This recipe doesn’t typically require a glaze since the cake mix and peach syrup create a lovely topping, but if you’re feeling fancy, a dusting of powdered sugar or a drizzle of extra evaporated milk mixed with a touch of vanilla extract can be a nice touch. I usually just serve it as is, or with a dollop of vanilla Ice Cream!
Step 9: Slice & Serve
Scoop generous portions of the warm cobbler into bowls. Make sure to get plenty of that tender topping and the gooey peaches. It’s absolutely divine served warm, ideally with a scoop of vanilla ice cream melting into it, or a dollop of whipped cream. It also makes a fantastic breakfast treat the next morning, though I can’t promise there will be any leftovers!
What to Serve It With
This 3-ingredient peach cobbler is so versatile, it fits into almost any meal or occasion! It’s a dessert that truly shines on its own, but here are a few of my favorite ways to serve it.
For Breakfast: Yes, you read that right! A small portion of this warm cobbler can be a decadent weekend breakfast. I love serving a small scoop with a strong cup of black coffee. It feels like such a treat. Sometimes, I’ll add a tiny dollop of Greek yogurt for a bit of tanginess. It’s a wonderful way to start a relaxed Saturday or Sunday morning.
For Brunch: At a brunch gathering, this peach cobbler is always a hit. I like to serve it in a beautiful clear dish so everyone can see those bubbly peaches and golden topping. It pairs wonderfully with lighter fare like fresh fruit salads and quiches. For drinks, a sparkling mimosa or a fresh juice complements its sweetness perfectly.
As Dessert: This is its most obvious role, and it excels here. Serve it warm with a generous scoop of good quality vanilla bean ice cream. The contrast of the warm, soft cobbler and the cold, creamy ice cream is pure bliss. A drizzle of caramel sauce or some chopped toasted pecans adds a lovely touch if you want to elevate it just a bit. It’s perfect for potlucks and family dinners.
For Cozy Snacks: This cobbler is the ultimate comfort food for a cozy afternoon or evening. When I’m curled up with a book or watching a movie, a small bowl of this warm, sweet goodness is exactly what I need. It’s simple, satisfying, and hits the spot every single time. It’s particularly lovely on a chilly day, warming you from the inside out.
My family has a tradition of making this on the last day of summer vacation. It’s our way of savoring the last bit of peach season and making a sweet memory before the back-to-school rush begins. It’s these little moments that make cooking and sharing food so special.
Top Tips for Perfecting Your 3-Ingredient Peach Cobbler
While this recipe is incredibly forgiving, a few little tricks can take it from good to absolutely spectacular. I’ve learned these through plenty of trial and error (and a few too many bowls!), so trust me on these!
Peach Prep: While you use the canned peaches and syrup as is, consider the quality. Fresher, more flavorful peaches in the can will yield a better result. If you happen to have access to really ripe, fresh peaches, you *could* use them, but you’d need to add about 1/2 cup of sugar and maybe a tablespoon of cornstarch to the fresh peach slices before adding them to the dish, along with a little water or peach juice to mimic the canned syrup. This adds steps, though, so for true simplicity, canned is best.
Mixing Advice: The most common mistake people make is over-mixing or trying to stir the cake mix into the peaches. Resist that urge! You want to sprinkle the dry cake mix evenly over the top and *gently* smooth it out. A few lumps are perfectly fine; they’ll bake into tender pockets. The goal is to create a distinct topping layer, not a uniform batter.
Swirl Customization: While this recipe doesn’t require manual swirling, you can encourage some beautiful patterns. If you want a slightly different look, after sprinkling the cake mix, you can very gently swirl the evaporated milk into the *edges* of the cake mix with a knife before baking. This can create some lovely caramelization on the edges. However, the natural bubbling during baking creates its own beautiful, rustic swirl effect which I actually prefer.
Ingredient Swaps: While the classic is yellow cake mix, don’t be afraid to experiment! A white cake mix will also work, yielding a slightly lighter topping. For a hint of spice, you could try a spice cake mix, but be mindful of the added spices – they might overpower the peaches. Some people have had success using a lemon cake mix for a brighter flavor profile. For the milk, I haven’t personally tested dairy-free alternatives in this specific recipe, but I suspect a rich, full-fat coconut milk from a can (the kind you use for curries, shaken well) might work, although it would impart a coconut flavor. Regular milk or half-and-half won’t provide the same richness and texture as evaporated milk, so I highly recommend sticking to it for the best results.
Baking Tips: Keep an eye on your cobbler during the last 15 minutes of baking. Ovens can be finicky! If the top is getting too dark but the center still looks a little wet, loosely tent the dish with aluminum foil. This will prevent the topping from burning while allowing the inside to finish cooking. Ensure your oven rack is in the center of the oven for even heat distribution.
Glaze Variations: As I mentioned, this cobbler is fantastic as is. But if you want to add a little something extra without much fuss, consider a simple sprinkle of Cinnamon Sugar over the dry cake mix before baking. Or, after it’s baked and still warm, drizzle a little melted butter mixed with a pinch of cinnamon over the top. For a sweet kick, mix a tablespoon of powdered sugar with a teaspoon of milk and a tiny drop of vanilla extract to create a quick glaze to drizzle over once slightly cooled.
Storing and Reheating Tips
One of the best things about this 3-ingredient peach cobbler (besides its ease!) is how well it stores. It’s wonderfully forgiving, which means leftovers are a real treat. Here’s how I keep mine fresh and delicious:
Room Temperature: Once cooled, you can leave the cobbler covered on the counter for up to 2 days. I usually just cover the baking dish tightly with plastic wrap or foil. It tends to hold up quite well at room temperature for that initial period, though in very warm weather, I’d err on the side of caution and refrigerate it sooner.
Refrigerator Storage: For longer storage, cover the cooled cobbler tightly with plastic wrap or transfer it to an airtight container and refrigerate. It should stay fresh and delicious in the fridge for up to 4-5 days. The topping might soften slightly over time, but it still tastes absolutely amazing. I find that the flavors actually meld even more, making it even tastier on day two or three!
Freezer Instructions: Yes, you can freeze this! Let it cool completely. Then, wrap the entire baking dish (if it’s freezer-safe) tightly with a couple of layers of plastic wrap and then a layer of aluminum foil. Alternatively, you can cut portions into individual servings, wrap them well in plastic wrap and then foil, and freeze them in a freezer-safe container or bag. It will keep in the freezer for about 2-3 months. Thaw it overnight in the refrigerator before reheating.
Glaze Timing Advice: If you decide to add a glaze (like powdered sugar and milk), it’s best to do this *after* the cobbler has cooled slightly or when you’re ready to serve it. Glazing a warm, freshly baked cobbler can make the glaze too runny. For stored cobbler, you can re-glaze it after reheating to freshen up the look and flavor.
Frequently Asked Questions
- Dusting of Powdered Sugar: A simple, classic choice.
- Whipped Cream: A dollop of freshly whipped cream is always a winner.
- Vanilla Ice Cream: The ultimate pairing, in my opinion!
- Caramel Sauce: A drizzle of good quality caramel sauce adds another layer of decadence.
- Chopped Nuts: Toasted pecans or walnuts sprinkled over the top add a lovely crunch.
- Cinnamon Sugar: A mix of cinnamon and sugar sprinkled on top before or after baking.
You can also just enjoy it plain – it’s that good!
Final Thoughts
Seriously, if you’re looking for a dessert that’s ridiculously easy, unbelievably delicious, and will make everyone think you’re a baking wizard, this 3-ingredient peach cobbler is it. It’s the kind of recipe that brings a smile to my face every time I make it. It’s proof that you don’t need a pantry full of fancy ingredients or hours of your time to create something truly special and comforting. This recipe has been a lifesaver on busy nights, a star at potlucks, and a cherished treat during family gatherings. If you love this simple peach magic, you might also enjoy my Easy Apple Crumble or my Quick Berry Cobbler – they share that same spirit of minimal effort for maximum flavor. I can’t wait to hear what you think! If you give this a try, please leave a comment below and let me know how it turned out, or share any fun variations you’ve discovered. Happy baking!
3-Ingredient Peach Cobbler
Ingredients
Main Ingredients
- 2.5 ounces Yellow Cake Mix
- 0.5 cup Butter melted
- 2 can Peach Halves drained and sliced
Instructions
Preparation Steps
- Preheat your oven to 375 degrees F (190 degrees C).
- Spread the drained and sliced peaches evenly in the bottom of a 9x13 inch baking dish.
- Sprinkle the dry cake mix evenly over the peaches.
- Pour the melted butter evenly over the cake mix.
- Bake for 35-40 minutes, or until golden brown and bubbly.
- Let cool slightly before serving.